Setting up your spending categories appropriately is absolutely the best way to start tracking where your money is going and the first step to setting up your budgets.
In this Money Management Tips post we’ll cover the essentials of properly setting up your spending categories in ClearCheckbook, how to view your monthly spending and finally how to set up budgets to keep your spending in check.
Setting up your categories:
We automatically create some default categories for you when you sign up with ClearCheckbook. These are some commonly used categories but are definitely not all-encompassing and we encourage you to add as many spending categories as you need to properly track where your money is going.
To manage your categories, click on Settings at the top right side of the page and then click on Categories. At the top of the page you’ll see a form where you can add new categories.
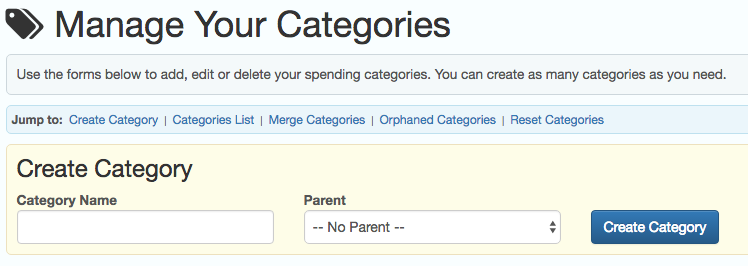
To add a new parent or sub category, enter the name of the new category in the Category Name field. Next, decide if you want this to be a parent or sub category. To create a new parent category, leave the Parent drop down list set to ‘No Parent’. If you select a category from the Parent drop down list, the new category will become a child of the selected category. Finally, click the Create Category button.
You want to make sure you create categories for everything you spend money on regularly. For example, if you regularly go to the movies, you should create a Movies category (maybe put this as a subcategory to Entertainment). If you do a lot of shopping you should create a Shopping parent category and then make subcategories for various articles of clothing. We’ll look at all of these in the reports later to see how much you’re spending and help you determine places you can cut back on.
Categorizing all of your transactions:
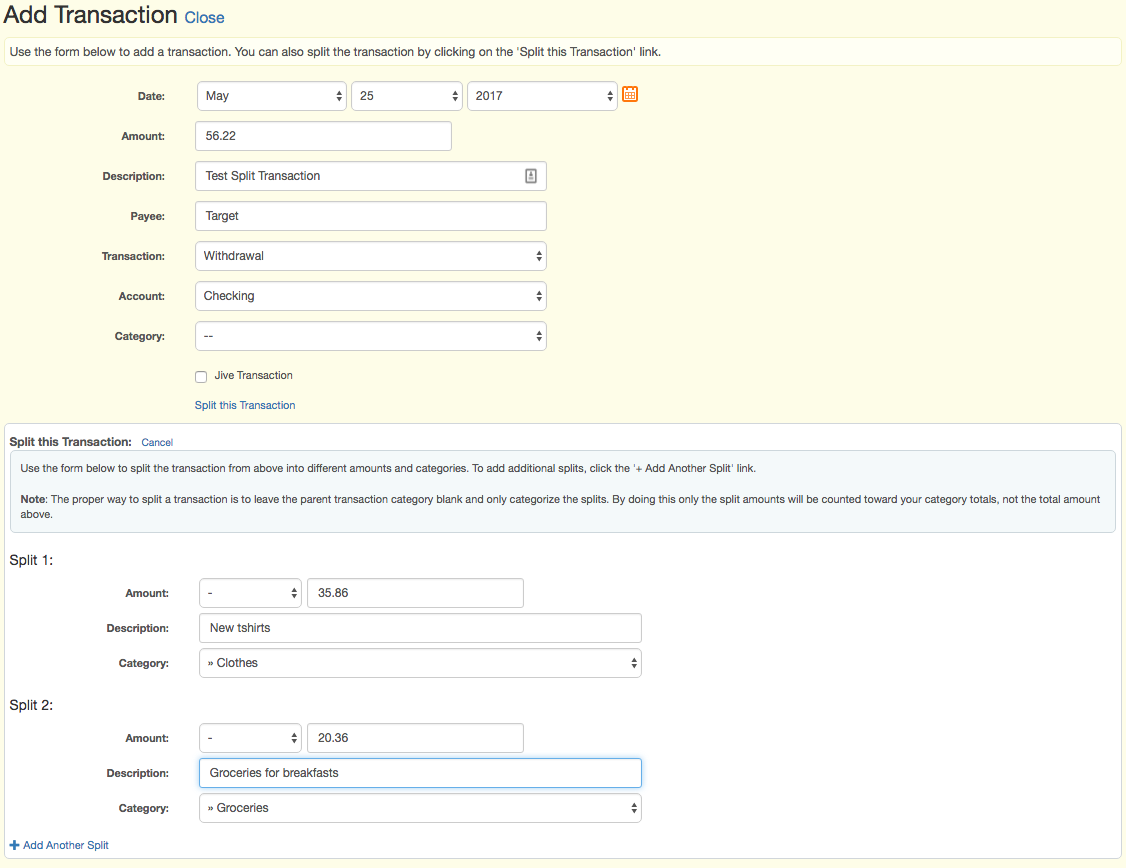
This step is extremely important. Whenever you add your expenses to ClearCheckbook you should be categorizing those transactions appropriately. When starting out, we recommend being extremely specific with your categorizing. For example, if you go to a store that sells both groceries and clothes and you buy some of both, you should split the transaction and categorize the amount you spent on each separately. Remember, when splitting a transaction the parent should not be categorized, just the split amounts.
Viewing your spending for your various categories:
We have several great reports for tracking where your money is being spent. The first is the Category -> Text reports.

The Category -> Text reports show a breakdown of your spending per category per month along with averages and totals for the year. Using this information you can quickly see how much money is being over spent in various categories that you might not have expected.
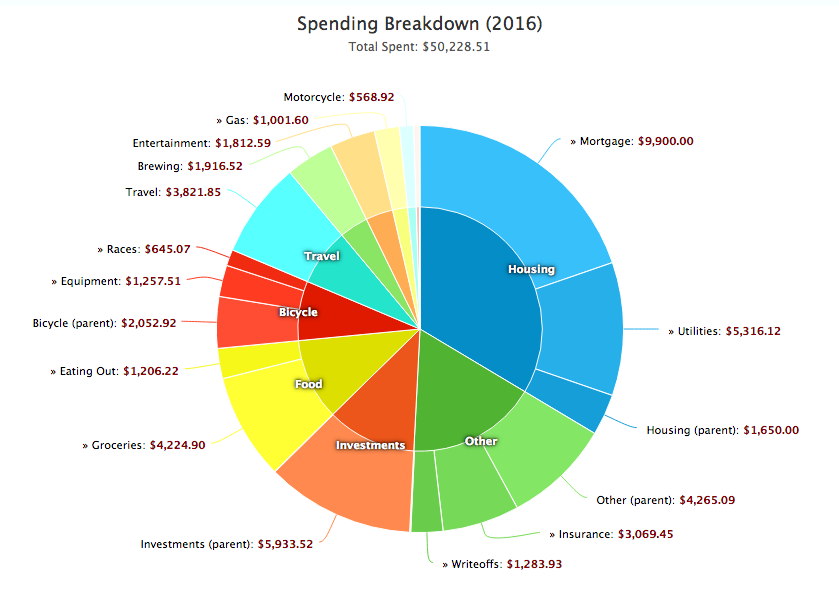
Another great report is the Category -> Pie by Year pie chart. This chart has all of your categorized spending broken apart by category for the entire year. Seeing large pieces of the pie can really help determine areas you need to cut back on spending.
Once you’ve looked at the various reports you should determine where you think you need to cut back on spending and how much you want to work on reducing your spending on your various categories.
Creating Budgets to keep your spending under control:
After identifying some categories you think you can cut back on, the next step is to create budgets to help you keep your spending in check. To create a new budget, click on Budgets at the top of the page. If you haven’t already created any budgets then you’ll see a form where you can add a new budget. If you’ve already added some budgets, click the blue “+Budget” button near the top of the page to bring up the Add Budget form.
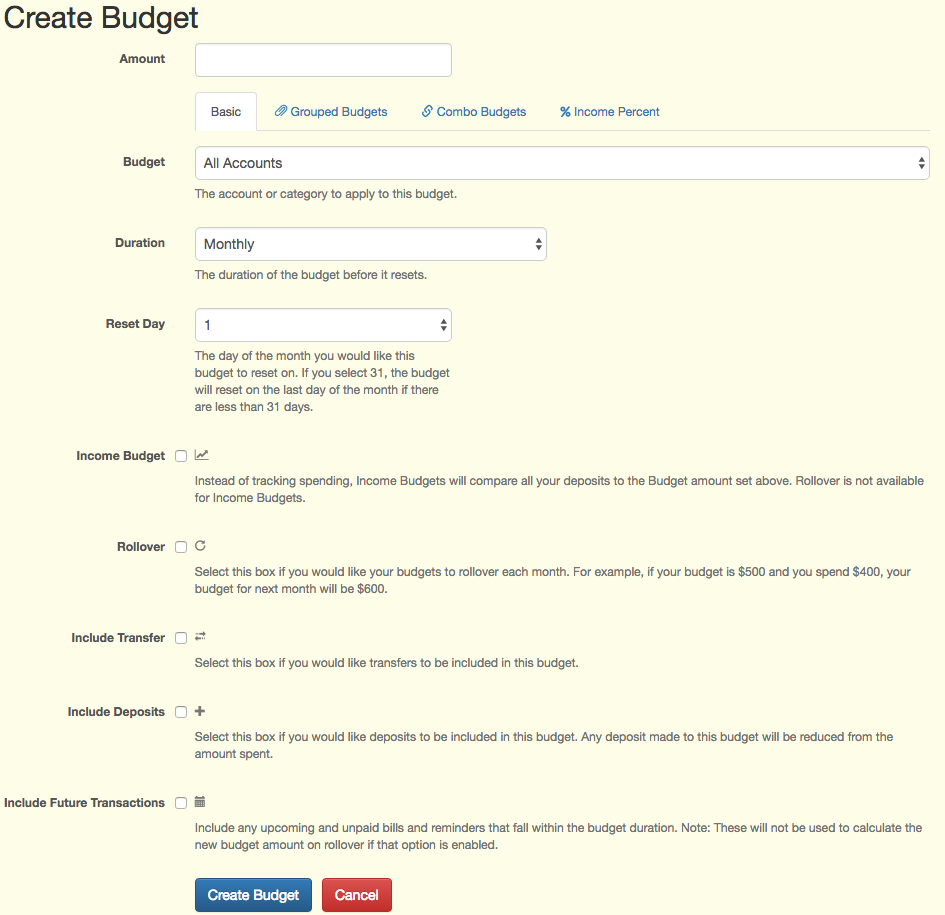
Using the options of the form, set up the budget that best fits your needs. Starting out we’d recommend either a Weekly or Monthly budget. You can base when the budget resets around your payday or simply the start of the month. We’d also recommend not enabling the Rollover option at the beginning. By not selecting that option you can really see how well you’re staying under your budget month after month.
To be successful, it’s important to be realistic when determining how much to set your budgets. Start off by setting the budget to about 90% of what you normally spend each month. This way you won’t feel as pressured to cut back dramatically but it’ll still be noticeable in the amount you save.
Monitoring your budgets and being cognizant about your spending:
Now that you’ve set up budgets for your various spending categories it’s time to keep an eye on them and to be mindful of how you’re spending your money. After you’ve reined in your spending by staying under budget you can challenge yourself even further by reducing the budgeted amount even further, or by cutting out spending to some categories entirely.
What to do with all the extra money you’re saving?
Since you’ve got some extra money each month that you didn’t have before, this is a great excuse to pay more toward any existing debts or to save it away for a rainy day fund or retirement. We’d recommend first paying off any credit card or other small debts first using our Debt Snowball tool to manage your debt.
This is part of our weekly
Money Management Tips series that aims to help you take more control of your finances. This series gives tips on everything from tracking your spending to improving your credit score.
