The Budgets tool lets you track your spending against set spending limits for your various accounts and categories. You can access the Budgets tool by clicking the Budgets link in the main navigation.
We have several different budgets to help you track your spending the way you want. An explanation of the various budgets is in the table below.
| Type | Description |
|---|---|
Basic |
This is the default budget type. This creates a budget based on All Accounts or a specific account or category. |
Grouped Budgets |
A Grouped Budget allow you to select multiple accounts and categories to be included in the budget. Note: Only available for ClearCheckbook Premium members. |
Combo Budgets |
Combo Budgets are for a set combination of accounts and categories. If you only want a budget set up for a category in a certain account, this is the type you're looking for. Note: Only available for ClearCheckbook Premium members. |
Income Percent |
An Income Percent budget lets you create a budget that's based on a percentage of your income. You can set the income percent for a specific account or for all of your income. For example, if you create a budget that's 40% of your Checking income for the month and you deposit $2,000, the budget would be $800. Note: Only available for ClearCheckbook Premium members. |
You can add a new budget by clicking the blue + Budget button in the navigation at the top of the Budgets page. The form that appears has many different fields and options which are explained in the table below.
We'll break down the different options by Budget Type (learn more) and let you know which options are availble to both free and premium members.
The Basic budget type has many of the fields that exist in the other budget types. This is the default budget type and is available to all ClearCheckbook members.
| Field | Description |
|---|---|
Amount |
This is the amount you want to set the budget for. All spending for the budget is compared to this amount to let you know if you're over or under budget. |
Budget |
Select the account or category you would like to create a budget for. The default is All Accounts. Only spending from this account or category is counted toward the budget. |
Duration |
How often you would like the budget to reset. The default is Monthly. If you change to one of the other durations you have the option of choosing a start date for the budget. |
Reset Day |
The day of the month you would like this budget to reset on. If you select 31, the budget will reset on the last day of the month if there are less than 31 days. |
Income Budget |
This option is available for ClearCheckbook Premium members. When selected, the budget will track income instead of expenses. |
Rollover |
Select this box if you would like your budgets to rollover each month. For example, if your budget is $500 and you spend $400, your budget for next month will be $600. |
Include Transfer |
By default, transfers are not included in the budgets since they are simply shuffling money around between your own accounts. Check this option if you would like transfers to count toward/against this budget. |
Include Deposits |
Select this box if you would like deposits to be included in this budget. Any deposit made to this budget will be reduced from the amount spent. Note: This option can cause some confusion. Please see below for clarification. |
Include Future Transactions |
Include any upcoming and unpaid bills and reminders that fall within the budget duration. Note: These will not be used to calculate the new budget amount on rollover if that option is enabled. |
Grouped Budgets has one field that isn't available in the Basic budget and one field that changes slightly.
| Field | Description |
|---|---|
Budget Name |
Since you can select multiple accounts and categories for this budget, we give you the option of naming this budget to something you'll easily remember. |
Grouped Budgets |
This is the select box where you can select which accounts and/or categories you want this budget to apply to. |
Similar to Grouped budgets, Combo Budgets has one field that isn't available in the Basic budget and one field that changes slightly.
| Field | Description |
|---|---|
Budget Name |
Since you can select multiple accounts and categories for this budget, we give you the option of naming this budget to something you'll easily remember. |
Combo Budgets |
There are two select boxes where you can select from a list of accounts and another where you can select from a list of categories. For example, if you select Checking from the Accounts box and Housing from the Categories box, only expenses from the Checking account with the Housing category will apply toward this budget.') |
The new fields for the Income Percent budget are below.
| Field | Description |
|---|---|
Percent of Income |
Select what percentage of your income you would like this budget to be calculated by. This replaces the Amount field since this budget works by using a percentage of your income. For example, if you create a budget that's 40% of your Checking income for the month and you deposit $2,000, the budget would be $800. |
From Income |
You can select whether you want the percent of income to apply to all of your accounts or one specific account. |
Note: The Income Budget, Rollover, Include Transfer, and Include Deposits options are disabled for Income Percent budgets.
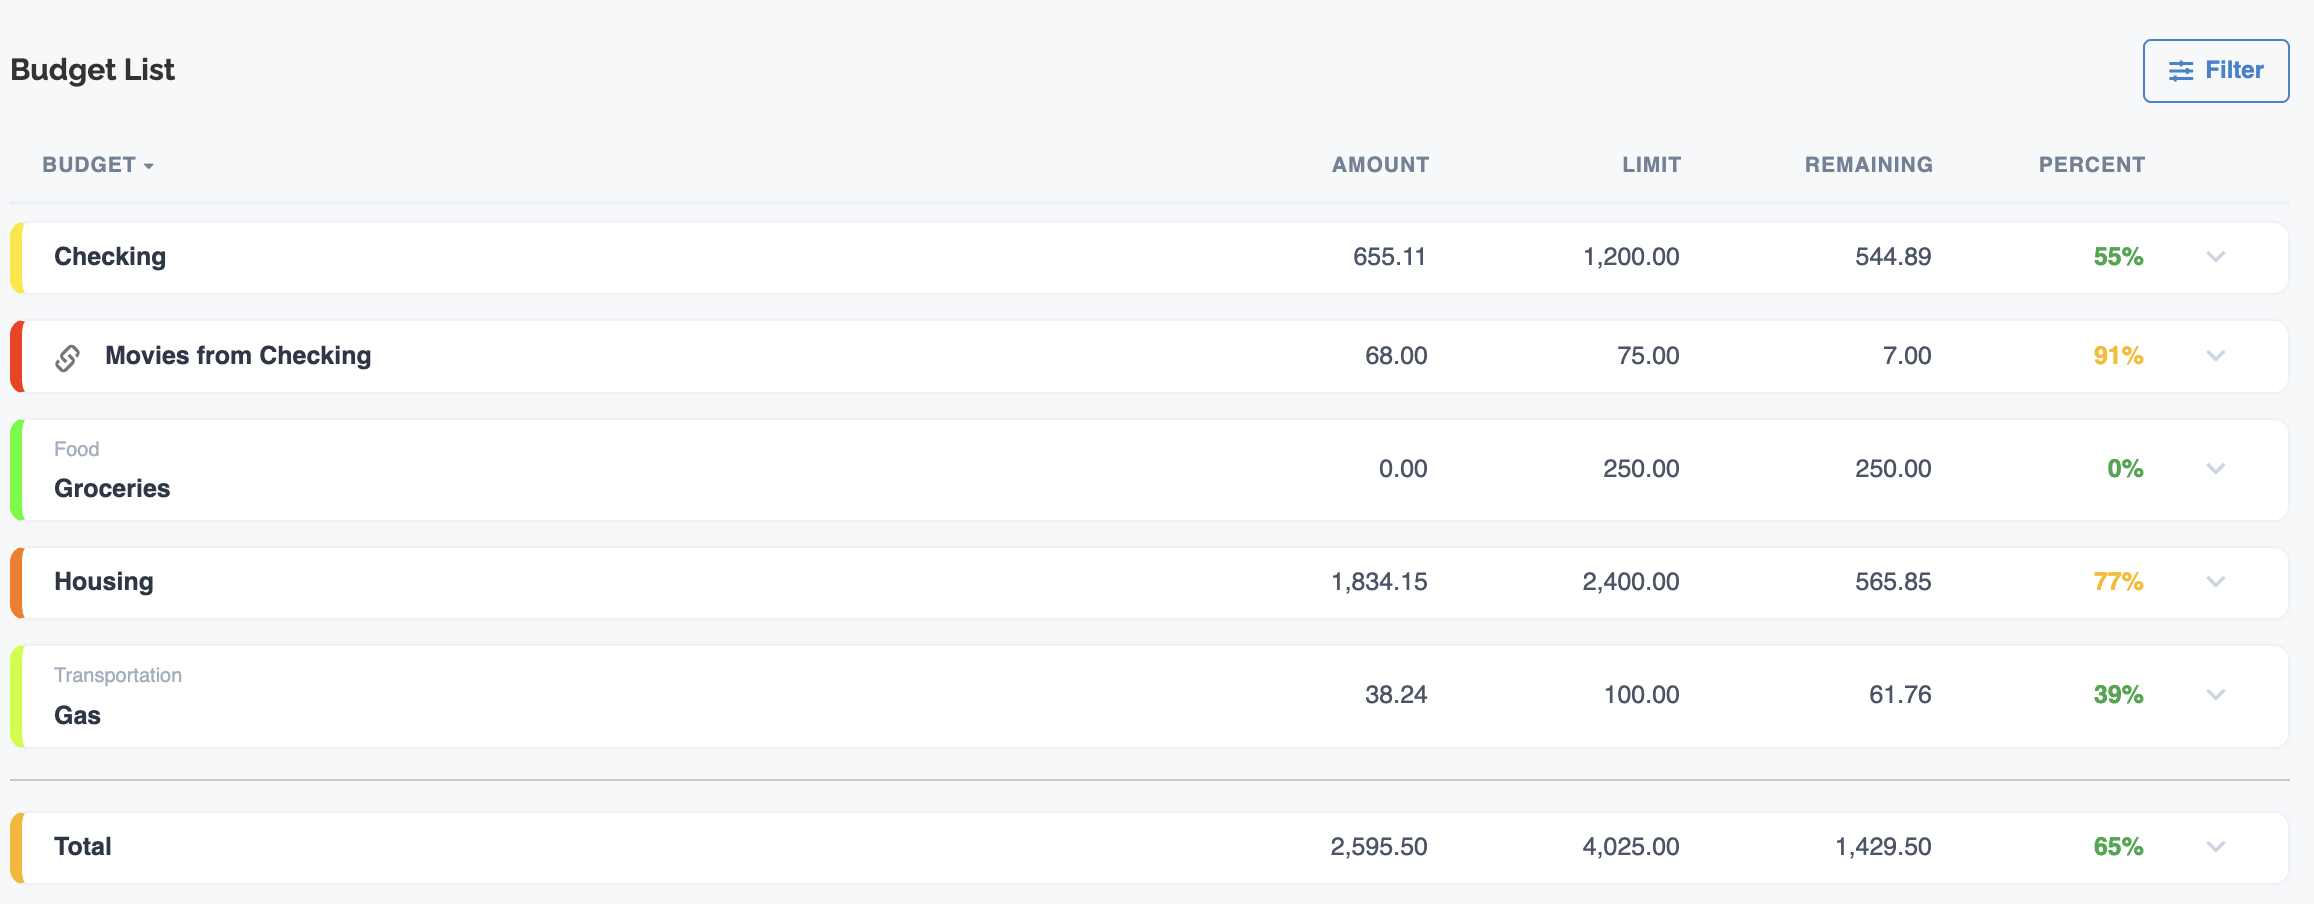
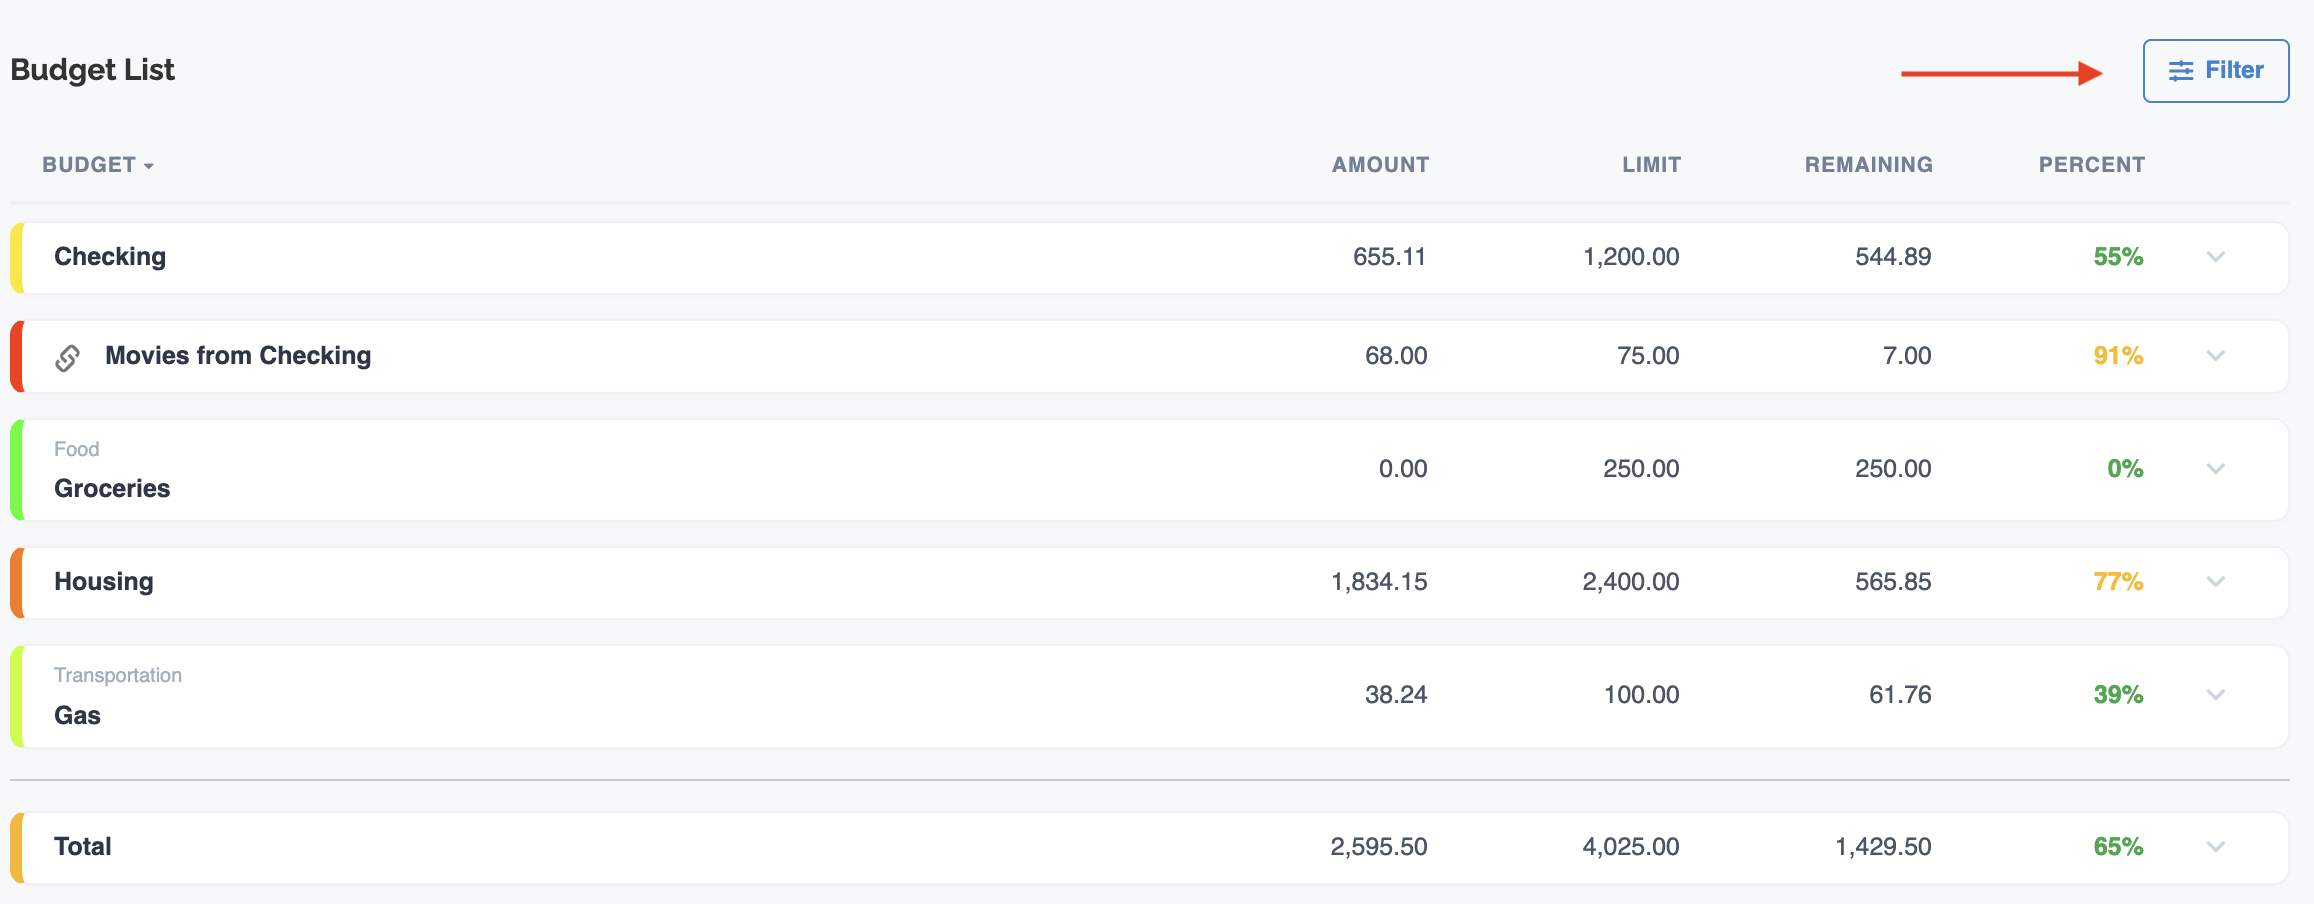
The Budget List section shows all of your budgets and each budget is color coded based on the percentage spent against the budgeted amount. You can click on a column header to sort by that column. Clicking on the budget will expand it to show more details (see Details section below).
Below all of your budgets is a Total column that sums all of the columns and shows you how you're doing overall.
| Column | Description |
|---|---|
Budget |
This column shows the name of the budget. If this is a basic budget, it's the name of the account or category the budget is applied to. Grouped, Combo, Income Percent and Income Only budgets will be identified with their respective icon in front of the budget name. If this budget is for a sub category, the parent category name will appear above it in smaller gray text. |
Amount |
This shows you how much has currently been spent in the budgeted account or category for the budget's current duration. |
Limit |
This is how much the current budget is set for. This amount can change month to month if the budget is set to roll over. Otherwise, it will stay constant when the budget resets. |
Remaining |
This is the difference between the Limit and the Amount columns. |
Percent |
This is the percent of the budget you've already used up and is calculated by dividing the Amount by Limit column. This also determins the color of the budget. |
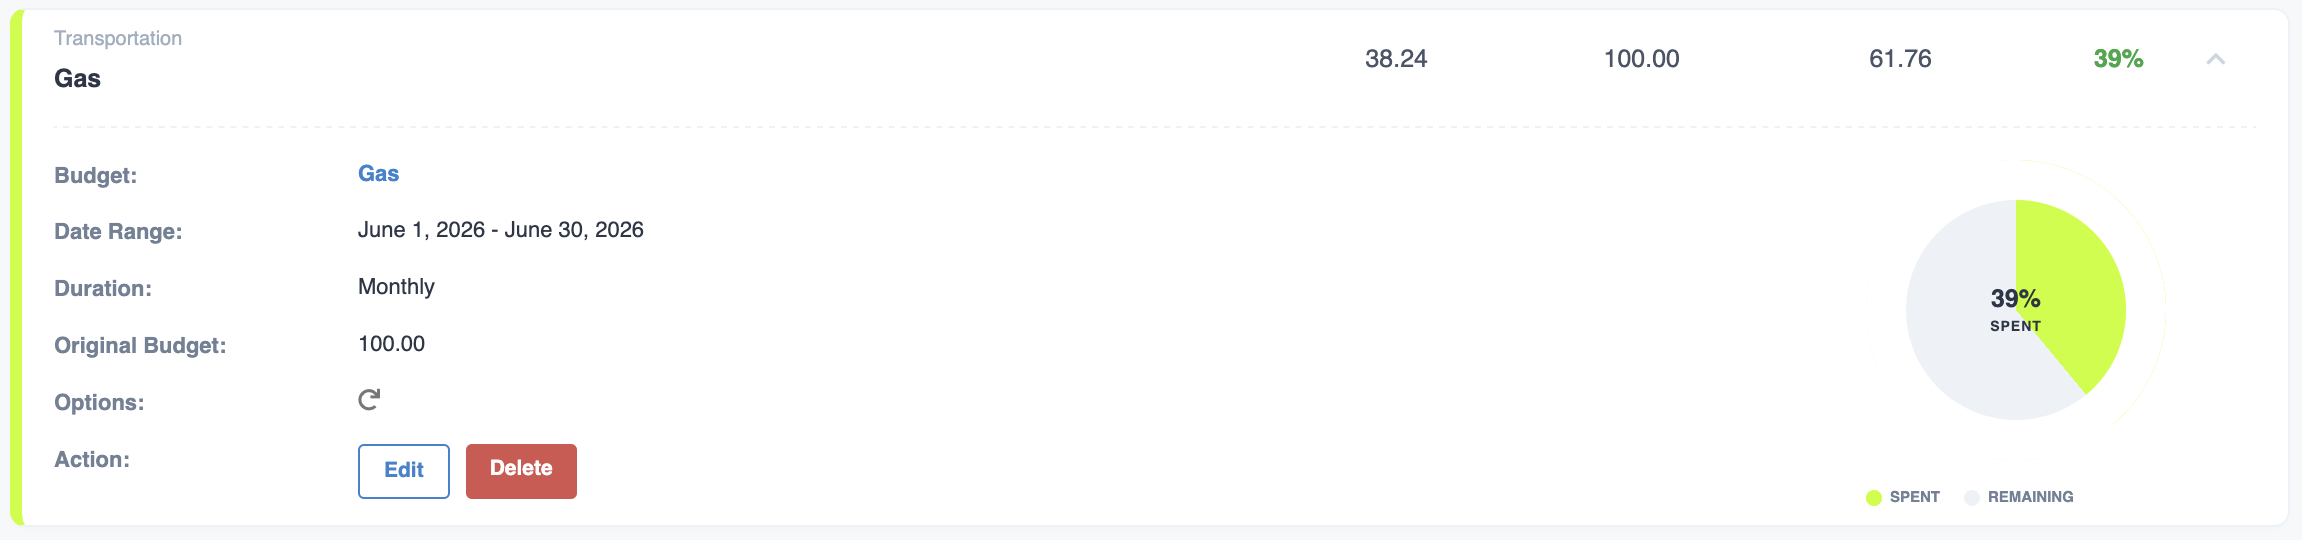
Clicking on a budget will expand that budget to show you more information. The information displayed will change slightly based on the budget type and which budget options you have selected.
The table on the left shows details of the budget and gives you the option to edit or delete it. There is a pie chart on the right that shows spent vs remaining budgeted amount.
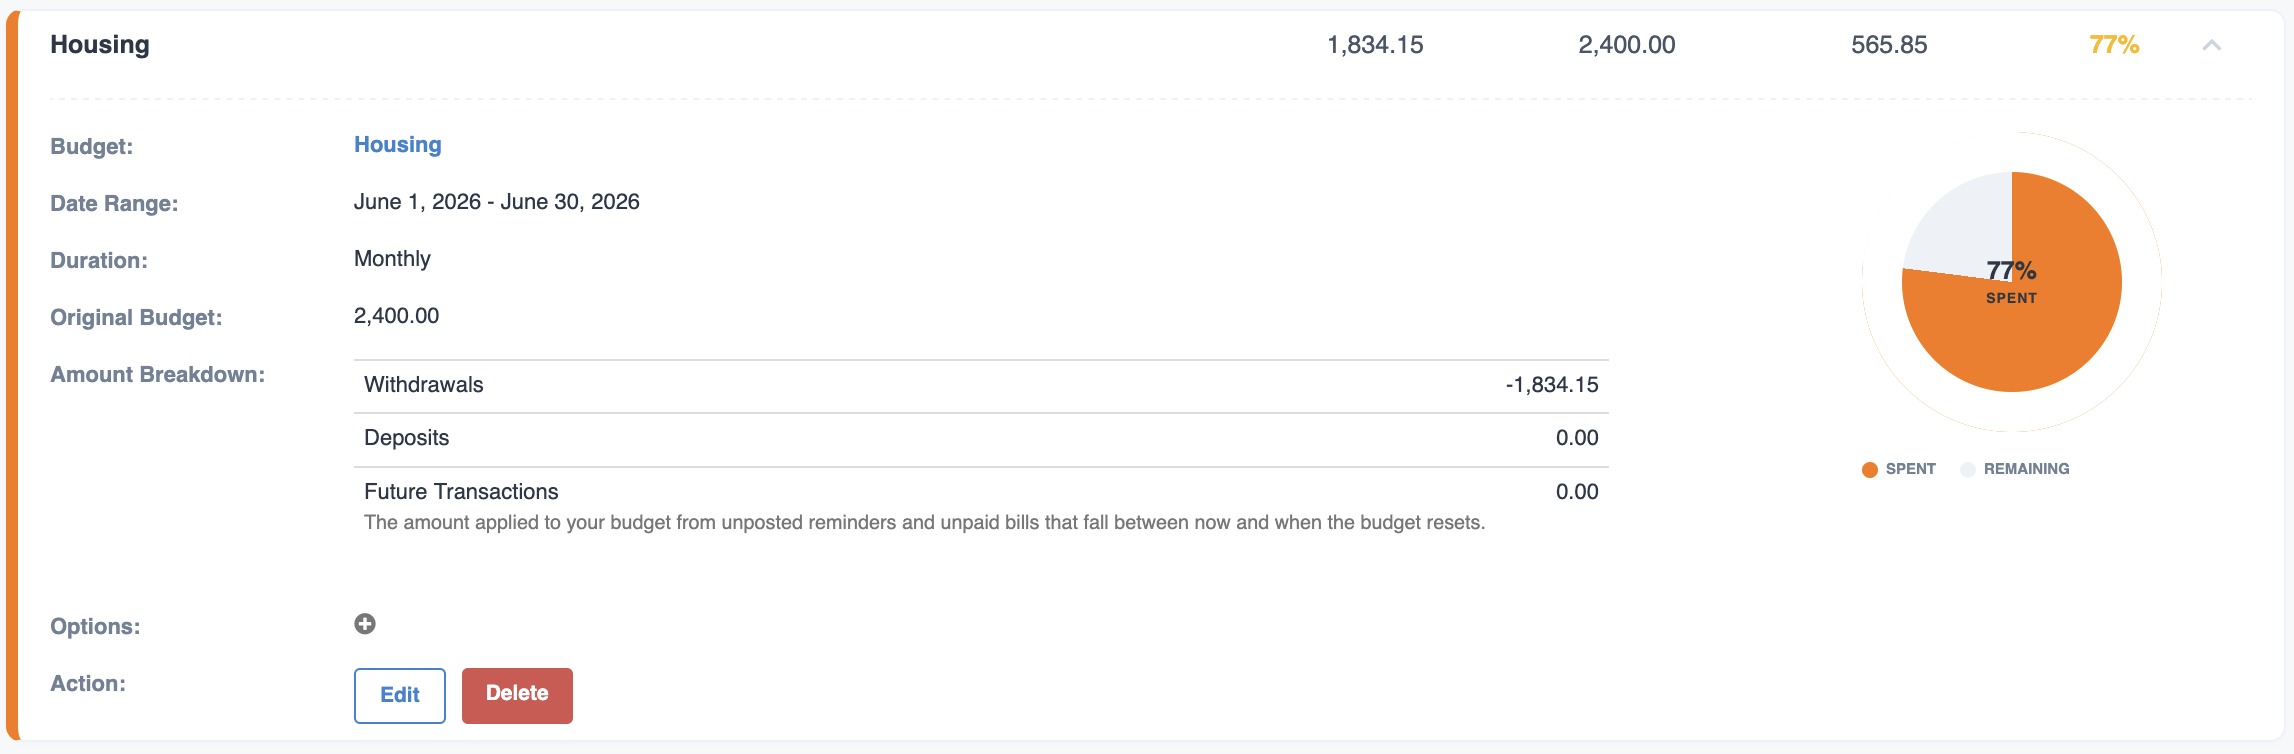
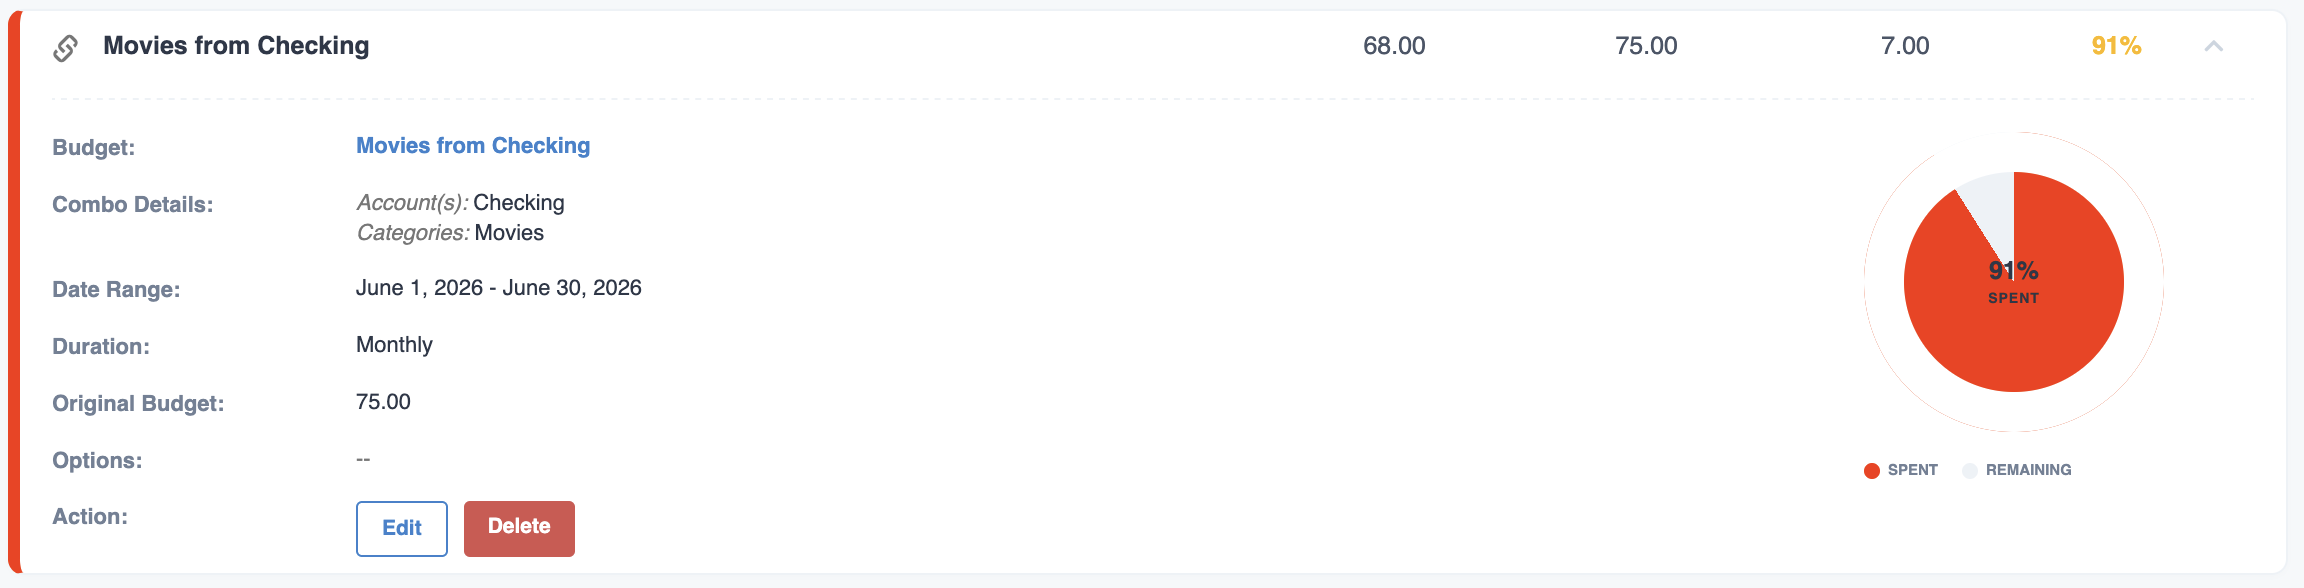
The table on the left has the following information:
| Column | Description |
|---|---|
Budget |
The budget name. If this is a basic budget, this is the account or category name. If this is a Grouped or Combo budget, it's the budget name you can set. Click on this to see a list of all transactions that are included in the Amount column. |
Grouped Details |
If this is a grouped budget, this lists which accounts and categories are included in the budget. |
Combo Details |
If this is a combo budget, this lists the account and category combination being used for this budget. |
Date Range |
Any transactions for the budget that fall between these dates will be calculated toward the amount spent. |
Duration |
How often this budget resets. |
Original Budget |
This is the amount you set for the budget when you originally created it. This is beneficial for budgets with rollover enabled so you can see what the original amount was. |
Amount Breakdown |
If you have the Include Future Transactions or Include Deposits options selected, this breakdown will appear and show you the totals for each type and how they affect your budget spent amount. |
Options |
The icons that appear here show you which options you have enabled for this budget. The options are: |
Action |
Edit and Delete are the actions here. Click on each one to perform the respective action. |
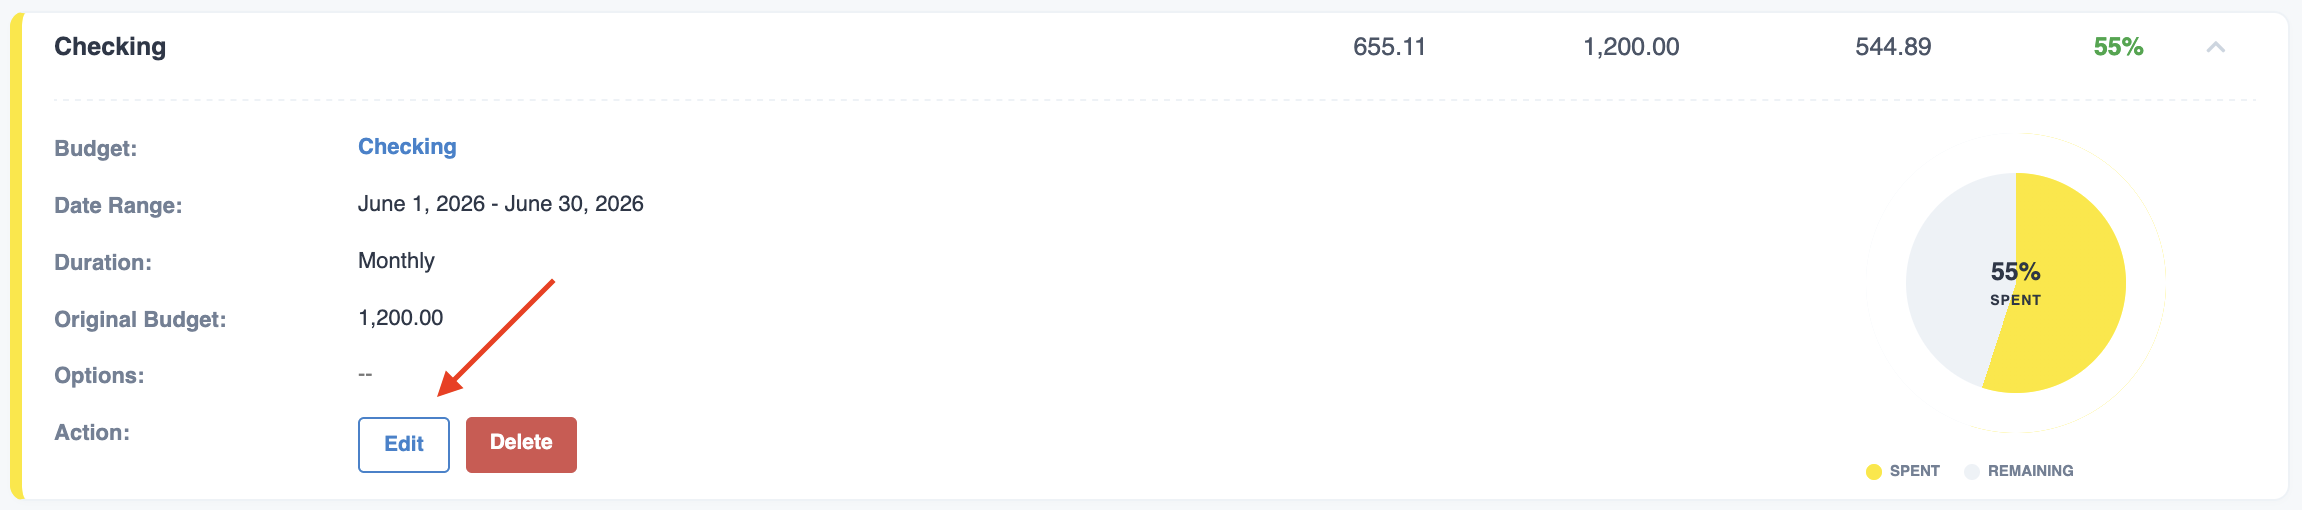
To edit a budget, click on the budget in the Budget List to expand it. Next, click on the Edit link in the Actions row. This will bring up a form where you can edit the budget details.
Delete link in the Actions row. 
This section explains how budget rollovers work if you have budgets set to rollover when the budget resets.
When you set up a budget and check the Rollover option, the amount of the budget is recorded as the Original Amount. This Original Amount is used when calculating the new budget amount after your budget resets. You can change the Original Amount by editing the budget.
To illustrate how the rollover process works, we'll use the example of setting up a monthly budget of $300 in your Food category.
| Month | Budget Amount | Amount Spent | Remaining | Budget Amount (after rollover) |
|---|---|---|---|---|
| January | $300 | $275 | $25 | $325 |
| February | $325 | $320 | $5 | $305 |
| March | $305 | $375 | -$70 | $230 |
| April | $230 | $225 | $5 | $305 |
| May | $305 | $293 | $12 | $312 |
| June | $312 | $312 | $0 | $300 |
The new budget amount is calculated by adding the Remaining to the Original Amount, which in this case is $300
We use the Original Amount when calculating the rollover to prevent an exponential growth in the budget amount, rendering the budget useless.
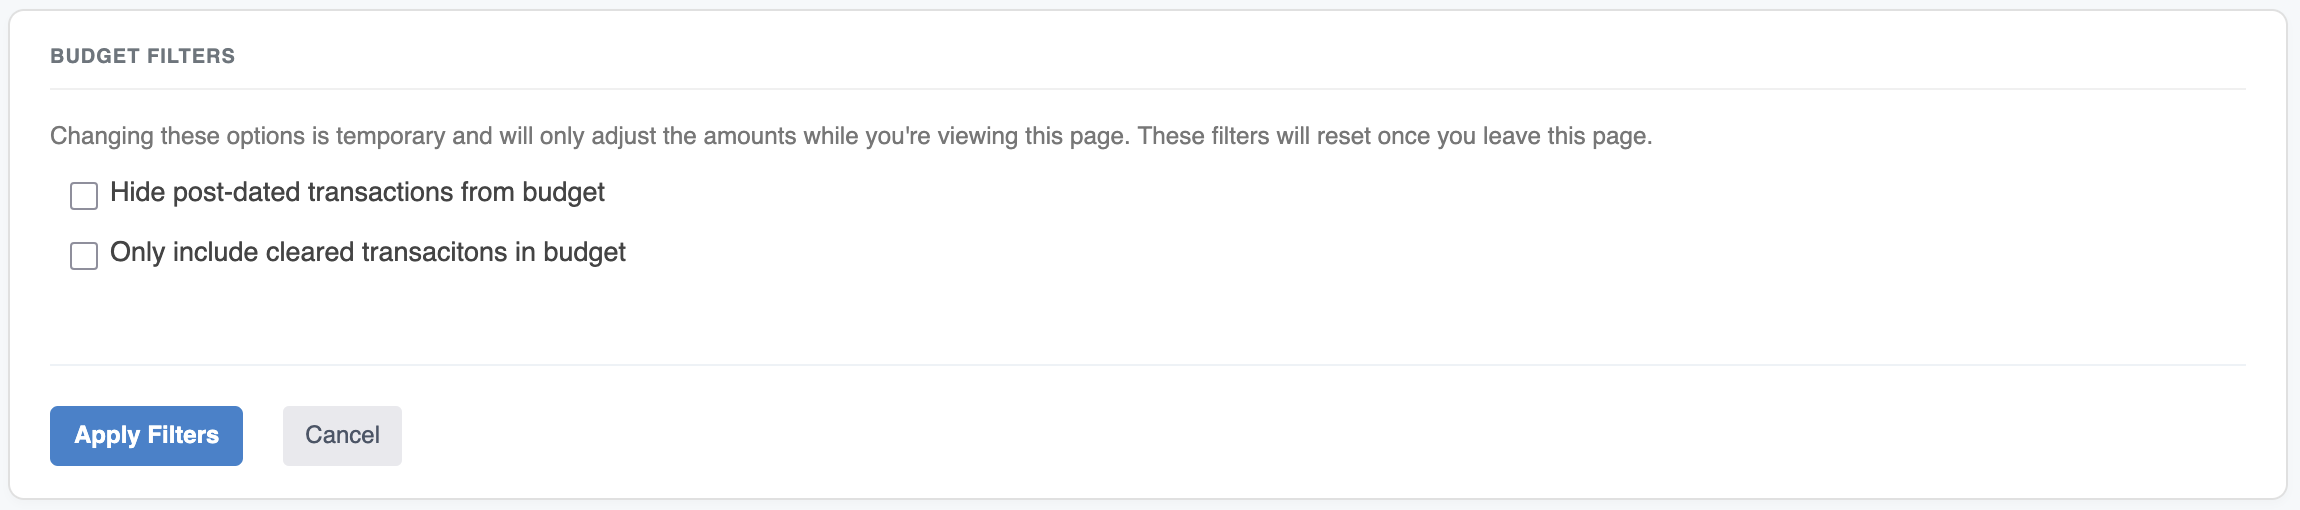
As a ClearCheckbook Premium member you can apply some filtering criteria to your budgets by clicking the Filter link at the top right side of the budgets list.
The Budget Filter gives you some options which affect the transactions that are included in your budget totals. The options currently available are described in the table below.
| Option | Affect |
|---|---|
Hide post-dated transactions from budget |
When selected, post-dated (future) transactions will be ignored when calculating the amount spent toward your budgets. |
Only included cleared transacitons in budget |
When selected, only cleared transactions will be included when calculating the amount spent toward your budgets. |
As a ClearCheckbook Premium member you can export your current budget list and your budget histories to CSV files.
To export your current budget list, click on the Export to CSV link below your budget list. This will prompt you to save a CSV file to your computer that contains the information currently shown in the Budget List.

To export the history for a budget, click on the Budget History link at the top of the Budgets page and then wait for the individual budgets to load in the Reports tab. After that, you can click the Export to CSV link under the budget name. This will download a history of your spending vs budget amount.
We get a lot of emails from users who are confused why their budget spent amount doesn't seem to be updating. There are a couple of reasons this might be happening so please check the reasons below before getting concerned.
The first thing we want to mention is that you can view all of the transactions that are currently being calculated in the budget by expanding the budget in the Budget List and then clicking on the budget name. This will take you to a search results list that shows all of the transactions.
| Cause | Solution |
|---|---|
| Include Deposits option is checked | This is the most common issue when it comes to the budgets seemingly not being updated properly. When you check the For example, if you spent $75 but deposited $50, the amount spent would show up as $25 ($75-$50). Also, if you deposited more than you spent, the amount spent will never go negative. Depositing $100 and spending $25 will still show the amount spent as $0 ($25-$100 = -$75, but it will appear as $0). |
| Date not in budget range | Each budget has a date range based on the duration of the budget and when it last reset. For example, if you have a monthly budget with the current date range as March 1, 2020 - March 31, 2020 but have added a transaction outside of that date range, it will not appear in the budget amount spent. |
| Transactions not added to correct account or category | Double check that the transaction has been added to the correct budget account or category. This is usually the culprit in grouped or combo budgets where the budget accounts and categories are very specific. |
Budget: row that appears. This will take you to a search results page where you can see exactly which transactions are being used to calculate the amount spent. ClearCheckbook Premium members have the ability to access a history of their budgets in both graph and text formats. To access the Budget History section, click on the Budget History link in the navigation at the top of the Budgets page.
The first history page that loads will be the Reports. This page loads a visual history of your spending vs budgeted amount for each time your budget has reset. If the history is a Grouped or Combo budget, you can click on the Group Details or Combo Details link below the budget name to view which accounts/categories make up that budget.
The duration of the budget and a link to download that history to a CSV file is also shown below the budget name.
Hovering over the graph will produce a tooltip that shows the amount spent and the budgeted amount for each reset period.

ClearCheckbook Premium members have the ability to access a history of their budgets in both graph and text formats. To access the Budget History section, click on the Budget History link in the navigation at the top of the Budgets page.
The text version of your budget history shows you a list that looks very similar to your active budget list. The list shows all budgets that reset during the given month. You'll notice in the screenshot below that Eating Out appears three times. This is due to that being set up as a Weekly budget.

Clicking on the budget name will expand the budget history item and show you the duration that budget was active. Clicking on the name in the Budget: row will take you to a Search Results page with all of the transactions that were calculated in that budget history item.
You can force ClearCheckbook to rebuild all of your budget history by clicking the Refresh Histories link at the bottom of the budget history pages.
This will delete all of your existing history and rebuild it based on all of the transactions you've entered.
Note: Refreshing your budget history will remove all rollover data and the budget amount will be what the current budget is set for.
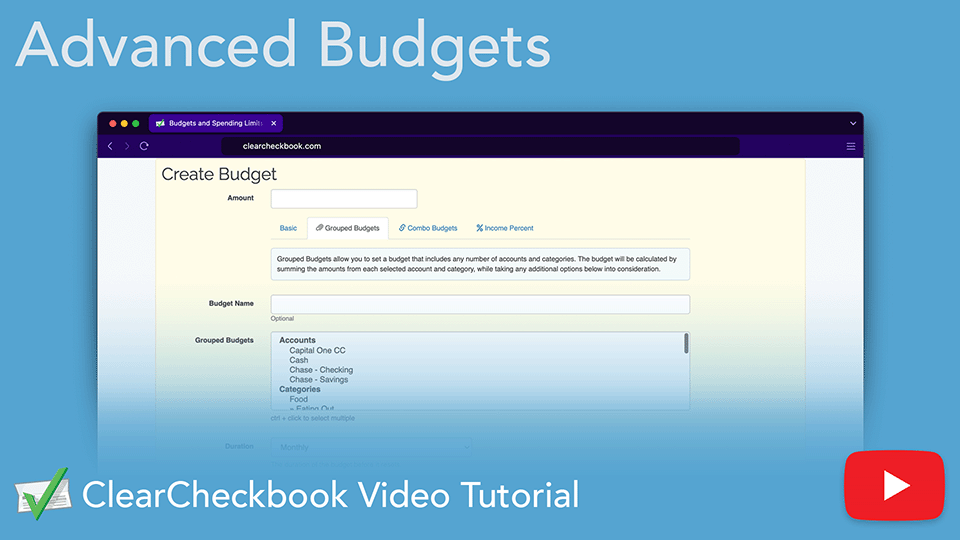
This video tutorial covers advanced budgeting features that are available to ClearCheckbook Premium members
Direct link to YouTube