These settings determine how transactions synced from your bank are added to your account. You can set some global settings as well as set up text and category replacements. An example would be if you normally fly on Southwest Airlines and the keyword Southwest shows up regularly in your synced transactions, you can match that keyword to your Travel category so that transaction will automatically be categorized properly.
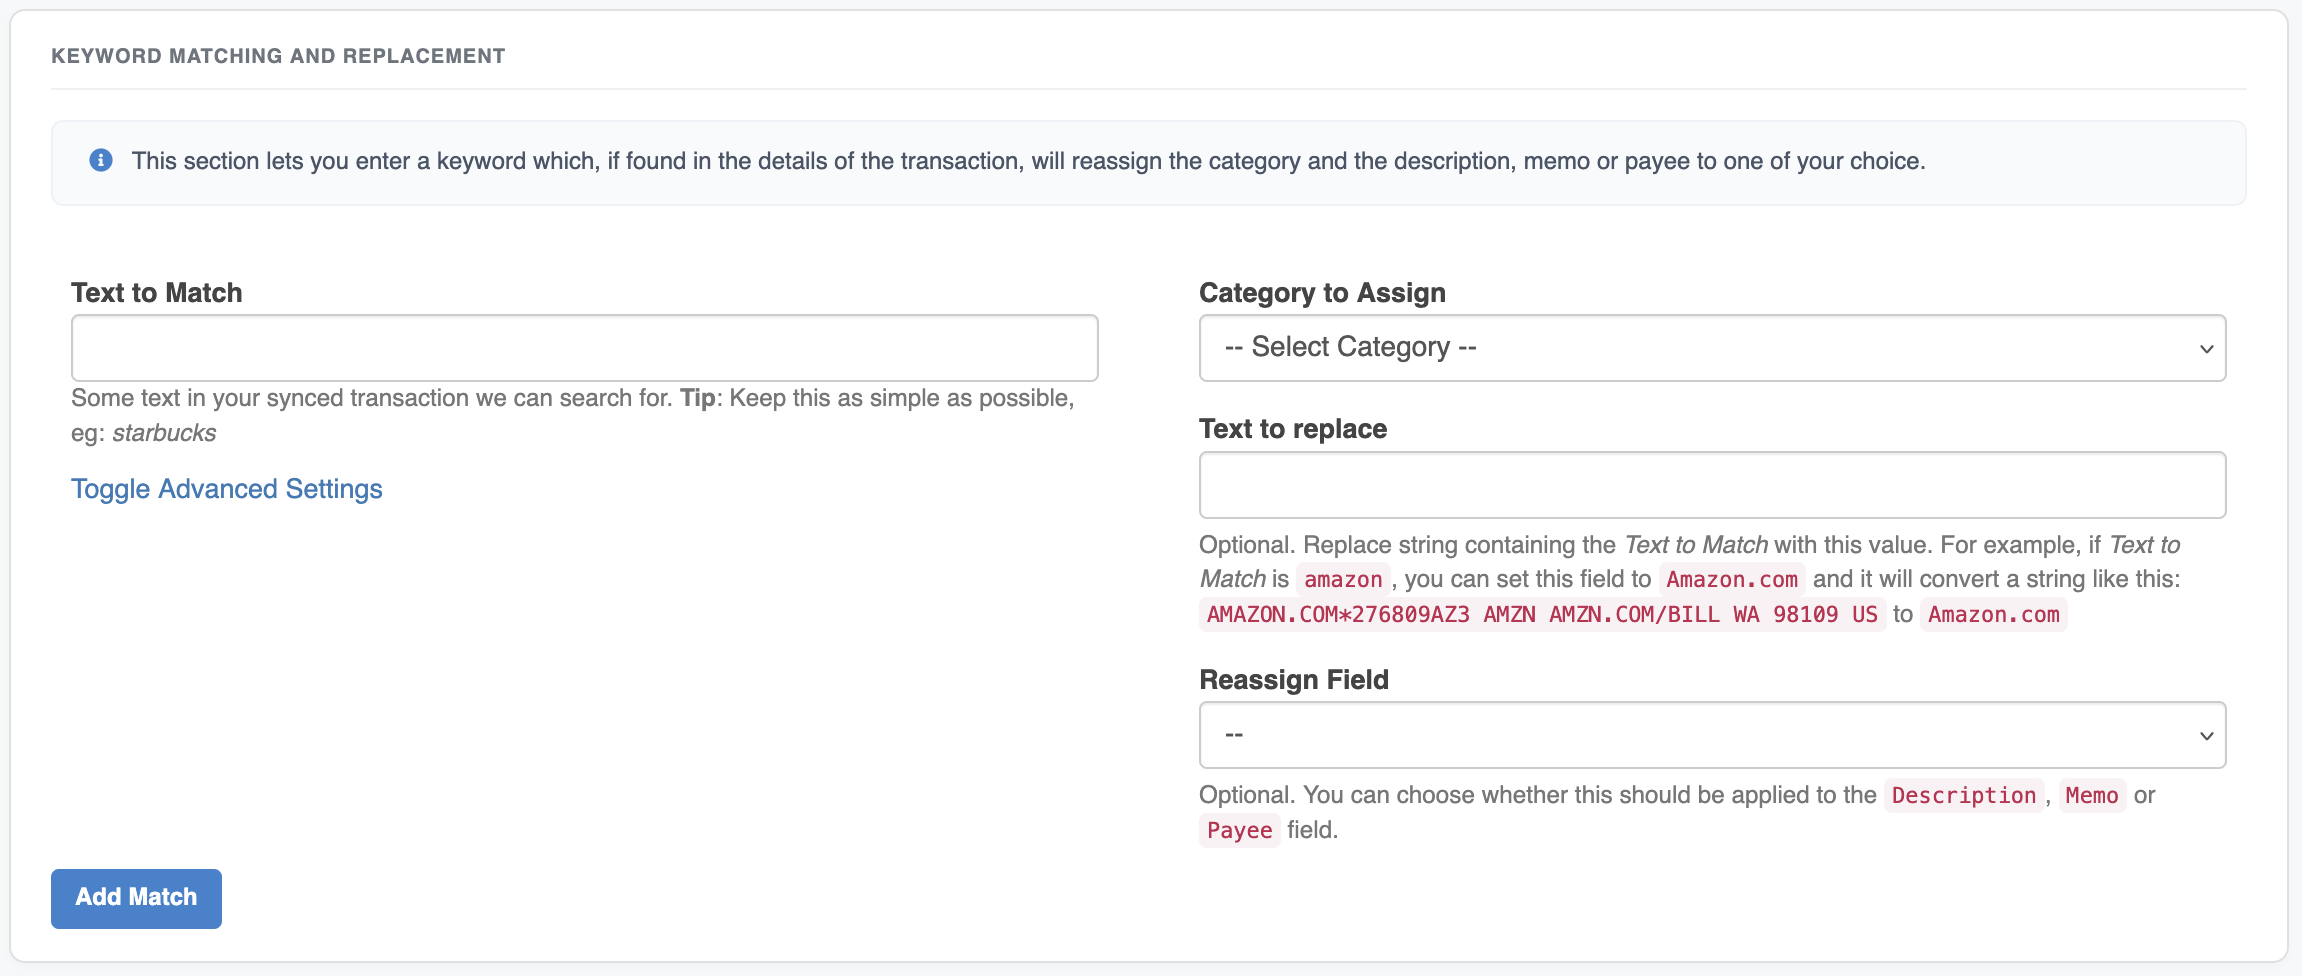
You can also set up text replacement for the description, memo or payee field in your synced transactions. For example, if you purchase something on Amazon, the text on your statement will show up as AMAZON.COM*276809AZ3 AMZN AMZN.COM/BILL WA 98109 US but you can set up a match to replace that string with Amazon.com
Settings at the top right side of the page, then click on Synced Transaction Settings under the Syncing Transactions header.There are two settings you can change that affect the way your transactions are added to your account. The global settings are as follows:
| Setting | Description |
|---|---|
Assign details to this field |
You can choose which field the transaction details (the short description associated with the transaction, such as Uber 072515 SF**POOL**) will be applied to. The choices are Description (default), Memo, Payee |
Use pre-assigned categories? |
The transactions that are synced from your bank come pre-categorized. These categories most likely won't exactly match the ones you've already set up in ClearCheckbook. You can turn off auto-categorization by selecting the No, Do not use pre-assigned categories option. This will leave the category field empty and you can assign a category later. |
Set posted transactions as cleared? |
When your transactions are synced each day, transactions are received as Pending or Posted. By default, any transaction flagged as Posted is marked as cleared. If you would prefer to manually clear your transactions, you can change this option to No - Do not clear any transactions.Note: this setting only affects regular daily transaction syncing and not the initial historical download. |
Hide pending transactions on register? |
This option can be turned on if you don't want to see pending transactions in your transaction register. When enabled, any pending transactions will be hidden and your balances will not reflect the pending transactions. There will be a small alert above the transaction list on the Transaction Register that shows how many pending transactions are currently being hidden for the selected account(s). |
Retrieve Account Owner Information? |
Some institutions will send the name of the cardholder used for each purchase along with the rest of the transaction information. If you have joint card and would like to know who made each purchase, we recommend turning this on. When turned on, the account owner name (if provided) will be prepended to the tranaction detail field (description, memo or payee). Note: not all institutions will send this information. |
Check for duplicate transactions? |
If you manually enter transactions in an account that's also set up for syncing, setting this option to Yes will flag any synced transactions that appear as a duplicate of those you manually entered. See the section below for an explanation of the duplicate flagging |
Automatically merge duplicate transactions? |
If you manually enter transactions in an account that's also set up for syncing and don't want to manually merge duplicates, you can set this setting to Yes and ClearCheckbook will attempt to automatically merge your manually entered transaction with the synced version. If you have many transactions with the same amount entered frequently, you may want to forego this setting as it could merge the wrong transactions. |
If you enable the Check for duplicate transactions setting, all transactions that sync from your bank are compared against those you manually entered and checks to see if there might be a duplicate.
The duplicate filter checks for any transactions that match all of the following criteria:
If a possible duplicate is found, a small alert is shown in the synced description.

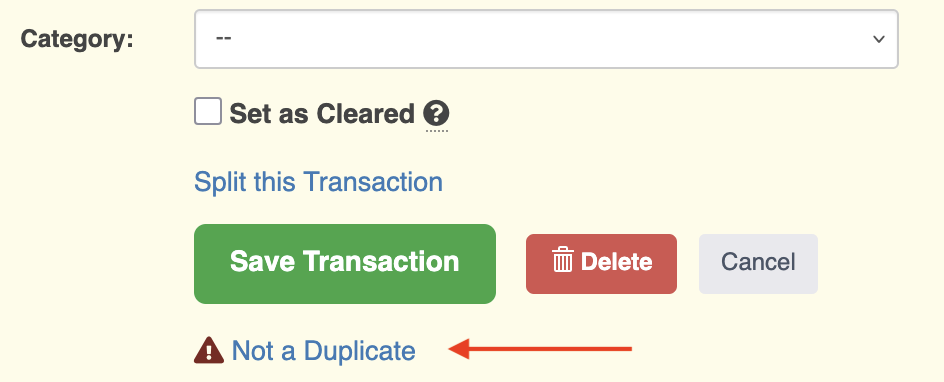
When a duplicate flag is shown, you can choose to delete the manually entered transaction, delete the synced transaction or remove the alert flag. To remove the flag, click on the transaction to edit it and click on the Not a Duplicate link. This will remove the flag from the transaction.
Here we'll explain in more detail how the synced transactions that appear in ClearCheckbook get their description and payee text. These fields are populated by various data sent to us from the transaction processor. Your synced transactions contain two different text fields when they arrive. Those two text fields are merchant and name.
merchant and name explained:The merchant field, if populated, usually contains a short description of the vendor or business. If you purchase something from Amazon, the merchant field will be Amazon.com.
The name field has a more descriptive explanation of the transaction. Using the Amazon example from above, a purchase from Amazon.com may have a name field with text like AMAZON.COM*276809AZ3 AMZN AMZN.COM/BILL WA 98109 US
merchant and name to your transactions:By default, the merchant text is applied to the Payee field in your transactions while the name text is applied to the Description field.
If you changed your "Assign details to this field" setting to Payee, the name text will be appended to the merchant text and saved to the Payee field. In our Amazon example from above, the text showing up in your Payee field would be Amazon.com - AMAZON.COM*276809AZ3 AMZN AMZN.COM/BILL WA 98109 US with the Description and Memo fields remaining blank. If the merchant field doesn't contain any text, only the text from name will be applied to the Payee field.
If you don't have the Payee field enabled, you simply won't see any data from the merchant field appear in your transactions (although it will be there if you enable the Payee field in the Settings Premium Membership Custom Transaction Fields).
name field is used for any keyword matching.The keyword matching and replacement tool is a way for you to set up how you'd like synced transactions categorized and if you'd like the text replaced or applied to a different field. This is how you can set up rules so your transactions are categorized exactly as you want. You can learn more about why this is helpful in our General Sync with Banks Connect to a Bank knowledge base article specifically covering categorization.
The form at the top of the page lets you add new matches. Whenever transactions are synced from your bank, ClearCheckbook will search the description, memo or payee field for the matching keyword and automatically assign the category you choose. The various fields are shown in the screenshot and explained in the table below.
| Field | Description |
|---|---|
Text to Match |
Enter a simple keyword contained in the data for your imported transaction. We will look for this keyword when you import a file and match it to the appropriate category. |
Toggle Advanced Settings |
You can set amount conditions for your keywords when enabled (see the section below for more information). |
Category to Assign |
Which category you want the matched keyword assigned to. |
Text to Replace |
Optional. If the text from the Text to Match field is found in the field, it will be replaced with this value. |
Reassign Field |
Optional. If you want this text applied to a different field from your global setting, you can choose that field here. You can choose from the Description, Memo or Payee fields. |
We give you the option to set an amount condition for the matches in the situation you have two recurring transactions with the same description, but varying amounts, which should be categorized differently from each other.
When setting up the amount conditions for purchases / withdrawals, be sure to enter the - sign in front of the amount. Also keep in mind that a larger purchase is < (less than) a smaller purchase. For example, a purchase of 582.54 is less than a purchase of 25.44. If you need a refresher on ordering negative numbers, you can brush up on the number line here: Khan Academy - Ordering Negative Numbers
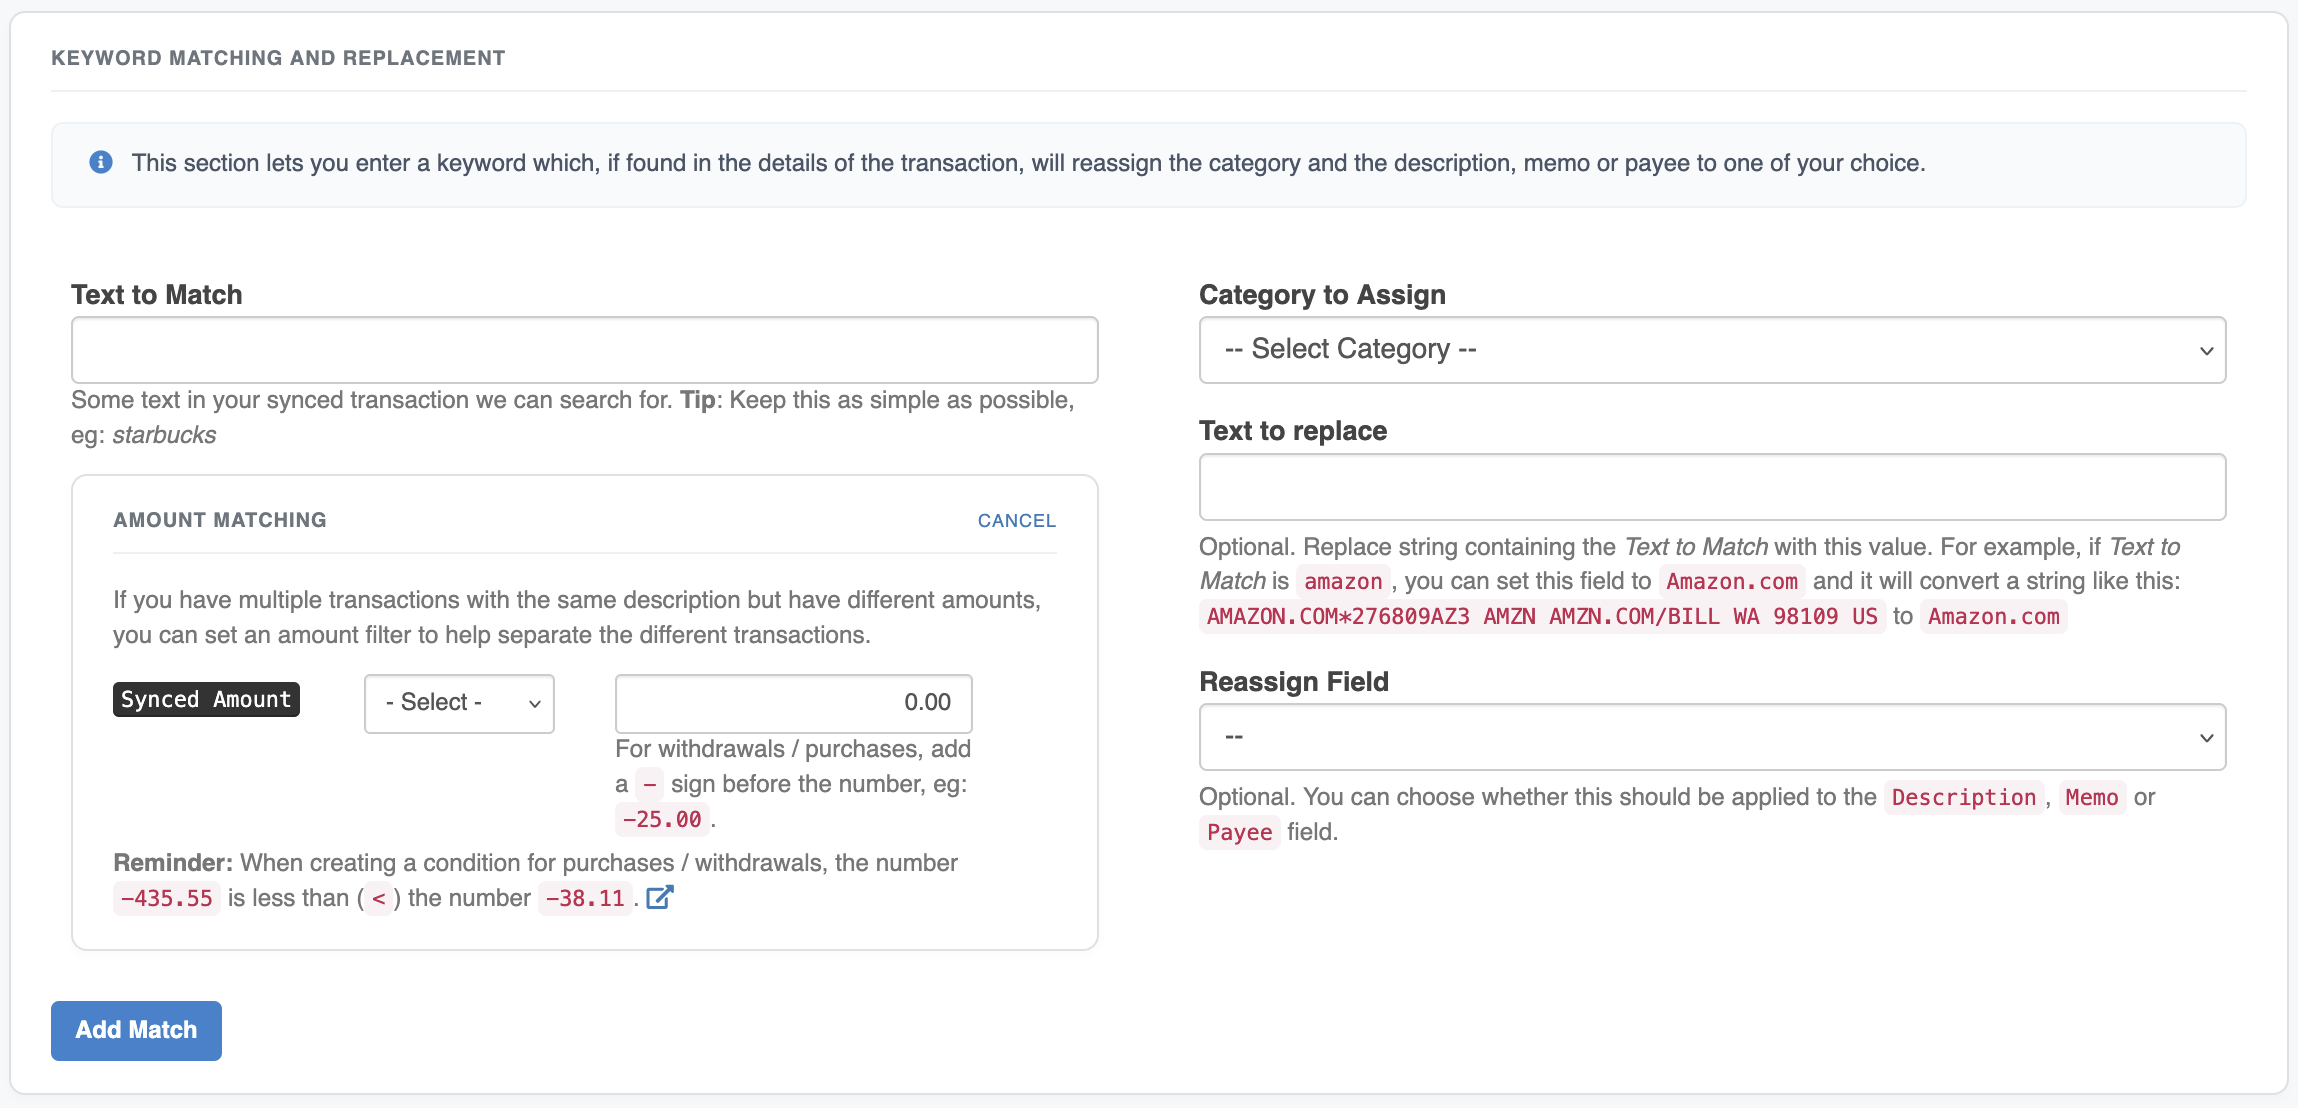
When you have keywords with amount matching enabled, the amount condition will appear to the right of the keyword, highlighted in yellow.

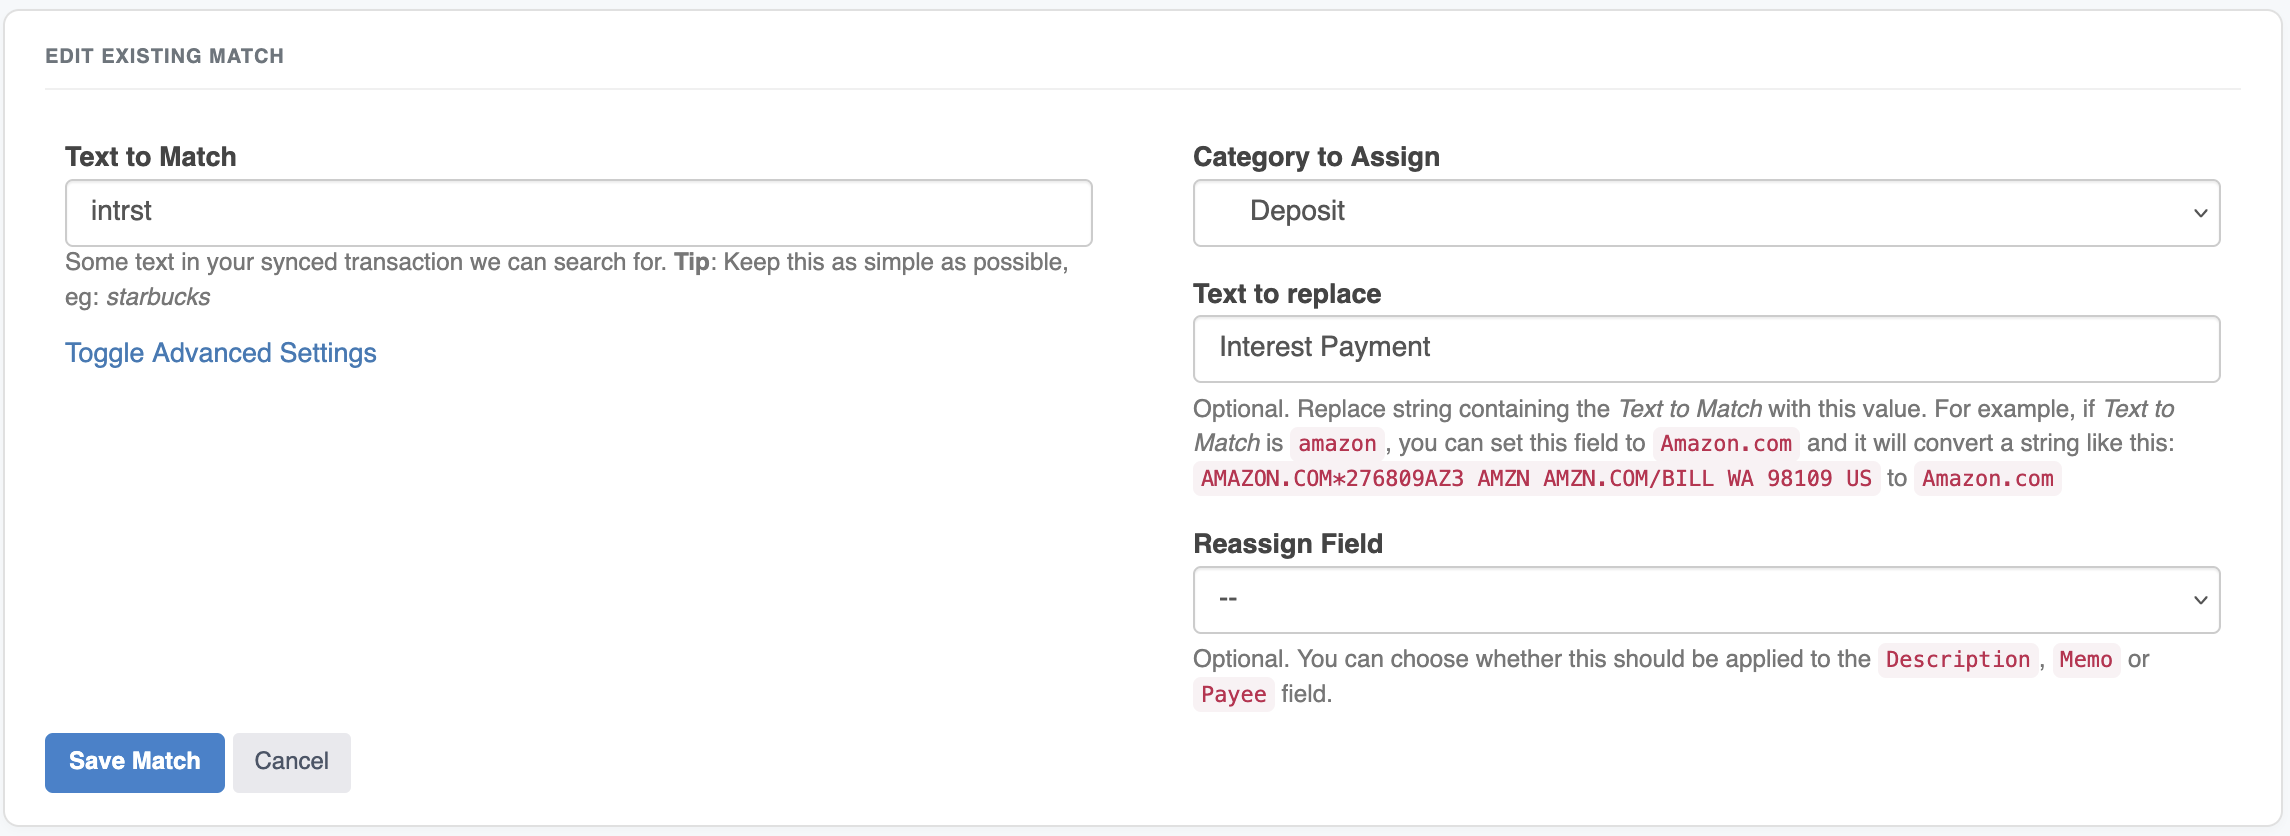
When you've added some matches, you will see them in the Existing Matches list. The matches are sorted alphabetically by keyword. The Text, Category and which Field the match will be applied to are all listed.

You can edit a match by clicking the icon at the top right side of the match you want to edit.

When you click on the edit icon, an Edit Match form will appear where you can modify the details of the match.
You can delete a match by clicking the icon at the top right side of the match you wish to remove. When removed, this match will no longer trigger when your transactions are synced.
