The Account Overviews box at the top left side of the Transaction Register shows the balance of the transactions based on the View and Account options selected in the Register Options box.
Different information will be displayed here based on a few different things:
| Information | What it is | When it shows up |
|---|---|---|
Balance |
The overall balance is the sum of all transactions, regardless of their cleared status. | The overall balance is always visible. |
Cleared |
The cleared balance is the sum of all cleared transactions. Your cleared balance should match your bank statement after performing a reconciliation. | The cleared balance is always visible. |
Credit Limit |
How much you have remaining toward the credit limit for the credit card you're viewing | If you're viewing a credit card account that you've set up a credit limit for. |
Today Balance |
The balance excluding any post-dated / future transactions. | If you've added transaction(s) to the register with a date in the future. You can disable this separation from the Settings Manage Your... General Settings page. |
View Specific |
The balance based on a View setting in the Register Options | If you change the view to only show a specific type of transaction such as only Cleared, Un-Cleared, Deposits, Withdrawals or Transfers. |

The Register Options block is where you can change what is shown on your transaction register and how your transactions are dipslayed. There are also links to other transaction related tools at the bottom of the Register Options box.
The Register Options block is found at the top right side of the Transaction Register, as shown below.

The Register Options block can be minimized and maximized if you don't want to see all of the options all the time. To minimize the information shown in the Register Options block, click the - link at the top right side of the block.

When minimized, the only option displayed in the Register Options box is the account selection form. To maximize the block again, click the + link at the top right side of the block.

The view options let you choose what type of transactions you want to see in your register. By default, all transactions are shown. The different view options are as follows:
| Option | Description |
|---|---|
All |
This option shows all transactions for the selected account (or all accounts). |
Cleared |
Only transactions that have been Cleared or reconciled will show up. |
Un-Cleared |
Only un-cleared transactions will show up in the transaction register |
Withdrawals |
This option will only show withdrawals, including the withdrawal portion of a transfer. |
Deposits |
This option will only show deposits, including the deposit portion of a transfer. |
Transfers |
The Transfers option shows only transfers. If you are viewing All Accounts, it will show both sides of the transfer (deposit and withdrawal). If you're viewing a specific account, it will only show the side of the transfer associated with the selected account. |
Future |
Select this view option if you only want to see transactions for today and future dates. |
Past |
Select this option if you only want to see past transactions in the transaction register. |
Split Parents |
This option will show only transactions which contain splits. |
If you select a specific view option you will see a yellow alert above the view options letting you know which one is active. When you select an option, this selection will persist until you change it.


Account selection will look slightly different based on your ClearCheckbook Premium status. Free members will have the ability to select between All Accounts or a single account. ClearCheckbook Premium members can select multiple accounts to appear in the register at once.


When you select an account or accounts other than All Accounts, only the transactions for the selected account will appear in the Transaction Register. The Account Overviews will also update to show the balances for just the selected account.

ClearCheckbook Premium members have the option of changing the number of transactions that appear per page in the register and in the Search results. 30 transactions is the default for both free and premium members. The other options are 50, 75 and 100. Whichever option is selected will remain until it's changed.

There are various tools related directly to transactions that can be found at the bottom of the Register Options box. The different links are as follows:
| Tool | Description |
|---|---|
Reconcile |
Reconcile takes you to the `Zero-Out Reconciliation` page where you can reconcile your transactions based on account starting and ending balances. Learn more here: Zero-Out Reconciliation |
Credit Card |
You can manage your credit card transactions and easily handle identifying credit card payments and which transactions were included in that payment. Learn more here: Credit Card |
Search |
This is a quick link that takes you to the Search tool. You can learn more about using the Search tool here: Searching |
Export |
Clicking this link will create a CSV file and export the transactions that currently appear in the transaction register. For a more robust export tool, see the Export Transactions tool |
Receipt Scanning |
If you want to upload scanned receipts and have the information from them converted into transactions, use the Receipt Scanning tool. You can learn more about how this works here: Receipt Scanning |

You can enable a Transaction Archive date in the Settings Manage General Settings - Archive Transactions page. When you enable the option and set a date, any transaction dated prior to that will be hidden from view on the transaction register.
When you set an archive date, it will appear at the bottom of the Register Options box and at the end of your transaction list. This will help remind you in case you forget the archive was set and are wondering why you're not seeing all of your transactions.


Note: This will not affect any of your budgets, reports, or search results. This will only filter the archived transactions out of view in the Transaction Register.

You can toggle your account balances list on the Transaction Register by clicking on + or - next to the Account Balances block directly below the Account Overviews and Register Options boxes.


When clicked, the Account Balances list will appear and show all of your accounts and associated Cleared and Overall balances.

If you have accounts with currencies that differ from your global currency, those account balances will appear with an italicized font and an alert will appear below the list letting you know the individual account balances are shown in their own currency but the overall balances are converted to your default currency.

You can hover over the italicized balances to see some more information, including which currency the account is using and what the balance is when it's converted to the global default currency.
ClearCheckbook Premium members also have the ability to click the column headers in the Account Overviews to sort on that column. You can sort any of the columns either in ascending or descending order. The column that is currently being sorted is identified with a down arrow next to the column name.

You can enable a special section on the Transaction Register that shows all of your upcoming recurring transactions and bills for the next year. This section also shows you how each future transaction affects your overall balance.

You can enable the Upcoming Transactions section from the General Settings. More info on enabling this section can be found in the Settings Manage General Settings - Upcoming Transactions Knowledge Base article
You can perform different actions when selecting transaction(s) from the transaction list. Below is a list of the various buttons that appear in the `With Selected` box at the top and bottom of the transaction list.
| Button | Description |
|---|---|
Clear |
All the selected transactions will be marked as Cleared when clicked. |
Un-Clear |
All selected transactions will be un-cleared when clicked. |
Edit |
This will bring up a form that lets you edit all selected transactions. For ClearCheckbook Premium members |
Delete |
All selected transactions will be deleted when clicked. |
Duplicate |
All selected transactions will be copied and pasted into the register. For ClearCheckbook Premium members |
Make Transfer |
If you select two transactions this button will appear. When clicked, it will make those two transactions into a transfer. For ClearCheckbook Premium members |
Merge |
If you select two transactions, one of which was synced from your bank, this button will appear. When clicked, it will merge the two transactions together. Learn more... |

If you have more transactions than can appear on the page, a page number selection bar will appear directly above and below the transaction list. To navigate to a different page, simply select the page number you would like to view.

You can change the sorting method of the transaction list by clicking on the column header you want to sort by. The column that's currently being sorted will have a darker background and an up or down arrow identifying the sorting method. Clicking that column again will switch between ascending and descending. Not every column can be sorted. Below is a list of all the columns and whether or not you can sort on them.
| Column | Able to select |
|---|---|
Date |
Yes |
Amount |
Yes |
Cleared |
No |
Account |
Yes |
Category |
Yes |
Description |
Yes |
Check # |
Yes |
Memo |
Yes |
Payee |
Yes |
Cleared / Overall |
No |

Depending on which part of the transaction you click on, different actions will take place. Clicking just about anywhere on the transaction will bring up an Edit Transaction form for that specific transaction. You can then edit or choose to delete the transaction from this form.
Clicking on the checkmark icon in the Cleared column will toggle the transaction's Cleared status.
Selecting the checkbox on the far left side of the transaction will let you perform any actions in the `With Selected` boxes at the top and bottom of the transaction list.
ClearCheckbook Premium members have the ability to merge synced transactions with those manually entered into your register. This is useful if you enter transactions manually or you use the Recurring Transactions tool to post transactions but also have your bank connected and transaction syncing enabled. With the Merge feature, you can combine the manually entered and the synced transaction together.
You have two places you can merge transactions. One is when they show up in the Potential Duplicate Transactions alert at the top of the transaction list (see the section below for more information on that), or by selecting transactions in the register and clicking the Merge button (covered by this section).
Merging transactions will keep all information from the manual transaction but replace the date and amount with that of the synced transaction. If the manually entered transaction doesn't have a description, payee or category associated with it, those will be taken from the synced transaction as well.
To merge two transactions, find one that has synced and one that was manually entered (or posted via the recurring transactions tool) and select them.

When you select one synced and one manually entered transaction, a new Merge button will appear in the With Selected box. Click the button to merge the two transactions together.
When the two transactions are successfully merged, a new transaction containing the merged details of the two transactions will appear at the top of your register with a yellow background. The two original transactions are removed when they are successfully replaced with the merged transaction.
If you connected your bank to ClearCheckbook and are receiving synced transactions but are also manually entering transactions, you may run into an issue where you have both a manually entered and synced version of the same transaction. When our system detects a potential duplicate transaction between a manually entered and synced version, a box will appear above your transactions list showing you these potential duplicates.
There are two sections to this alert box. The first section is when a manually entered transaction was found that matches a synced version. The second section shows any synced transactions that were flagged as a duplicate when they synced but a matching manually entered transaction couldn't be found. The most likely cause of the second scenario is the manually entered transaction was edited or deleted but the synced version still retained the duplicate alert.
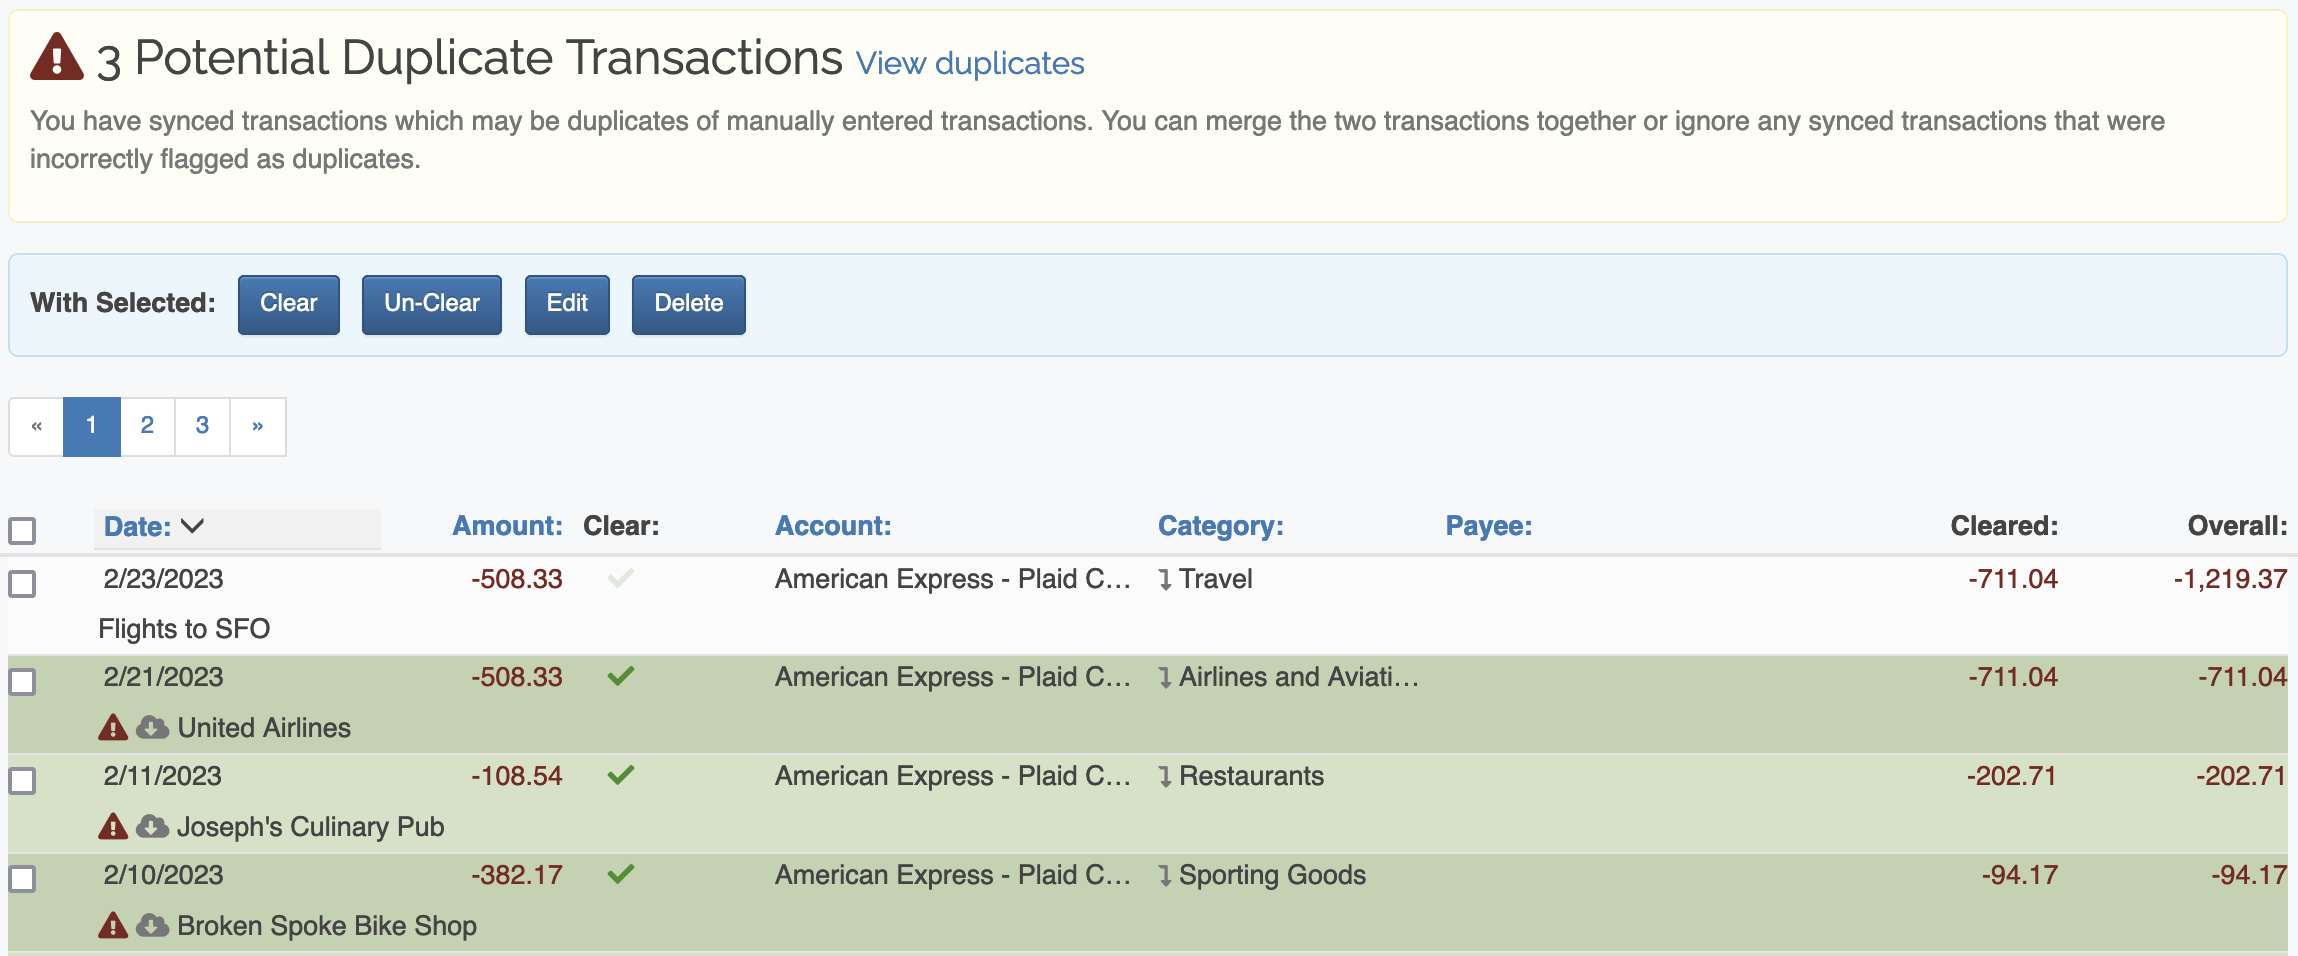

When both a manually entered and synced version of the transaction are found, you can opt to quickly merge the two together or ignore the duplicate flag (in the case the synced version was incorrectly flagged as a duplicate.)
Merging transactions will keep all information from the manual transaction but replace the date and amount with that of the synced transaction. If the manually entered transaction doesn't have a description, payee or category associated with it, those will be taken from the synced transaction as well.
To merge correctly identified duplicate transactions, simply click the Merge button next to the two transactions. If the transactions aren't duplicates, you can click the Ignore button so the transaction doesn't show up in the dupicates box.
If you see any transactions under the Synced Transactions with No Matching Manual Entry section, this means the synced transaction found a duplicate when it originally synced, but the possible duplicate has been edited or deleted since then. You can choose to ignore the duplicate flag by clicking the Ignore Duplicate Alert button.
When the two transactions are successfully merged, a new transaction containing the merged details of the two transactions will appear at the top of your register with a yellow background. The two original transactions are removed when they are successfully replaced with the merged transaction.
Some transactions will have special icons or data associated with them. Here's what those icons mean:
| Icon | Description |
|---|---|
|
This transaction is one side of a transfer. Click on the icon to redirect to a Search results page that shows the other side of the transfer. |
|
This transaction was a credit card purchase that has been paid off. Click on this icon to see the credit card payment details. |
|
This transaction has a file attachment. Click on the icon to see the file attachment. |
|
If you see this icon instead of the Cleared checkmark, Cleared Lock is enabled and this transaction cannot be modified in any way. You can adjust the Cleared Lock settings here: Settings Manage Your... General Settings |
« # Splits » |
This transaction has split children. The # sign will be the number of splits this transaction has. Click on the link to see those split children. |
|
This transaction has been automatically synced from your bank. |
|
This synced transaction might be a duplicate of an existing transaction you entered into your register. |
The Transaction Register is your central hub for managing finances in ClearCheckbook. View all your transactions, account balances, and upcoming transactions in one place. With powerful filters, custom layouts, and multi-account views, you’ll always know where your money is going. Track your past, plan your future, right from your register.
Direct link to YouTube