The Import Transactions tool allows you to import QIF, OFX, QFX and CSV files from your financial institution or another financial management application. The importing process has a few steps to help make sure you get all of the data you were expecting.
You can find the Import Transactions tool by clicking on Tools at the top of the page, then click on the Import Transactions link.The importing flow is broken into a few different sections to make whole process easier and more foolproof. That process is explained in brief here but in more detail in their own sections on this page.
The first thing you need to do is select the file QIF, OFX, QFX or CSV file from your computer. If you're importing a CSV file, make sure the file adheres to our recommended file structure.
Assuming transactions were found in the file you selected, you will be redirected to a page where you can match the fields in the file to those in ClearCheckbook. There are also other options you can change on this page that will affect how the transactions are imported. You can learn more about these options in the Import Options section.
After setting the import options the actual transactions will be processed from the file. Depending on the size of this file this might take a minute or two. You'll be redirected to the Import Verification page once the transactions have been loaded.
The Import Verification page shows all of the imported transactions in a table very similar to your actual Transaction Register. Think of this page as a waiting queue before the tranasctions are actually added to your transaction register. This is your chance to look over the transactions and make sure things like the dates and amounts look correct and that the fields matched up properly. You have the chance to edit or delete these transactions before fully importing them to your register.
Once everything looks good on the Import Verification page, you have the option to add all of the transactions, or a subset of them, to your transaction register. Any accounts or categories that are attached to these transactions but aren't already in ClearCheckbook will also be added.
The Import Transactions tool allows you to import QIF, OFX and QFX files. If you're a ClearCheckbook Premium member then you can also import CSV files.
QDF file. This is an encrypted file produced by Quicken that can only be read by Quicken. We cannot access any data in that file type.In order to make the import process function optimally, we recommend keeping the file below 350 kB in size (roughly 2,000 transactions). If you're unable to modify the file itself to reduce the size, we recommend exporting a smaller subset of transactions into the file.
For example, if you're trying to import the last 10 years of data from Quicken into ClearCheckbook and the exported file is too large, you can try exporting one or two years at a time.
Contact Us link at the bottom right side of the page and we can look into other options.The step of importing a file is to select it from your computer. When you click on the Import Transactions tool you will see a Browse button. When you click on that, a file browser will pop up that lets you select the file from your computer.

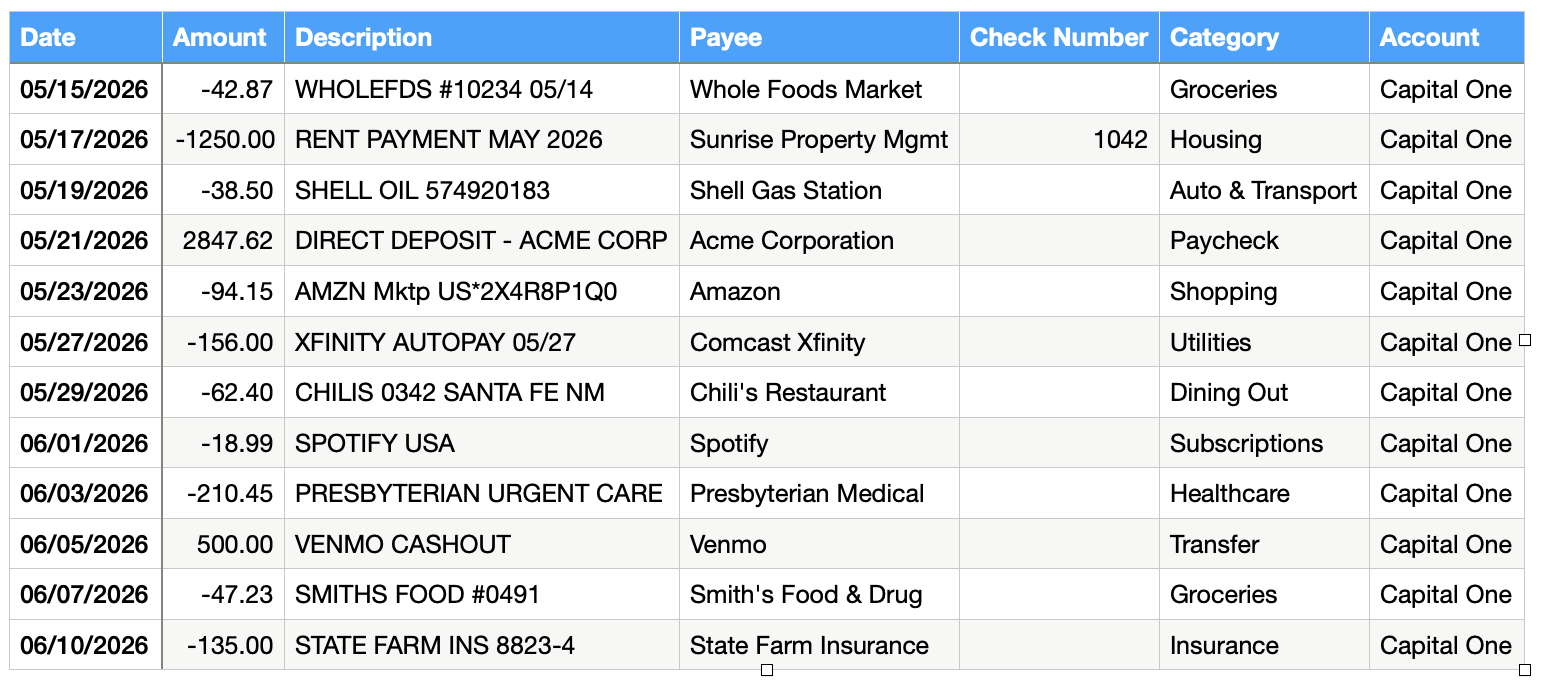
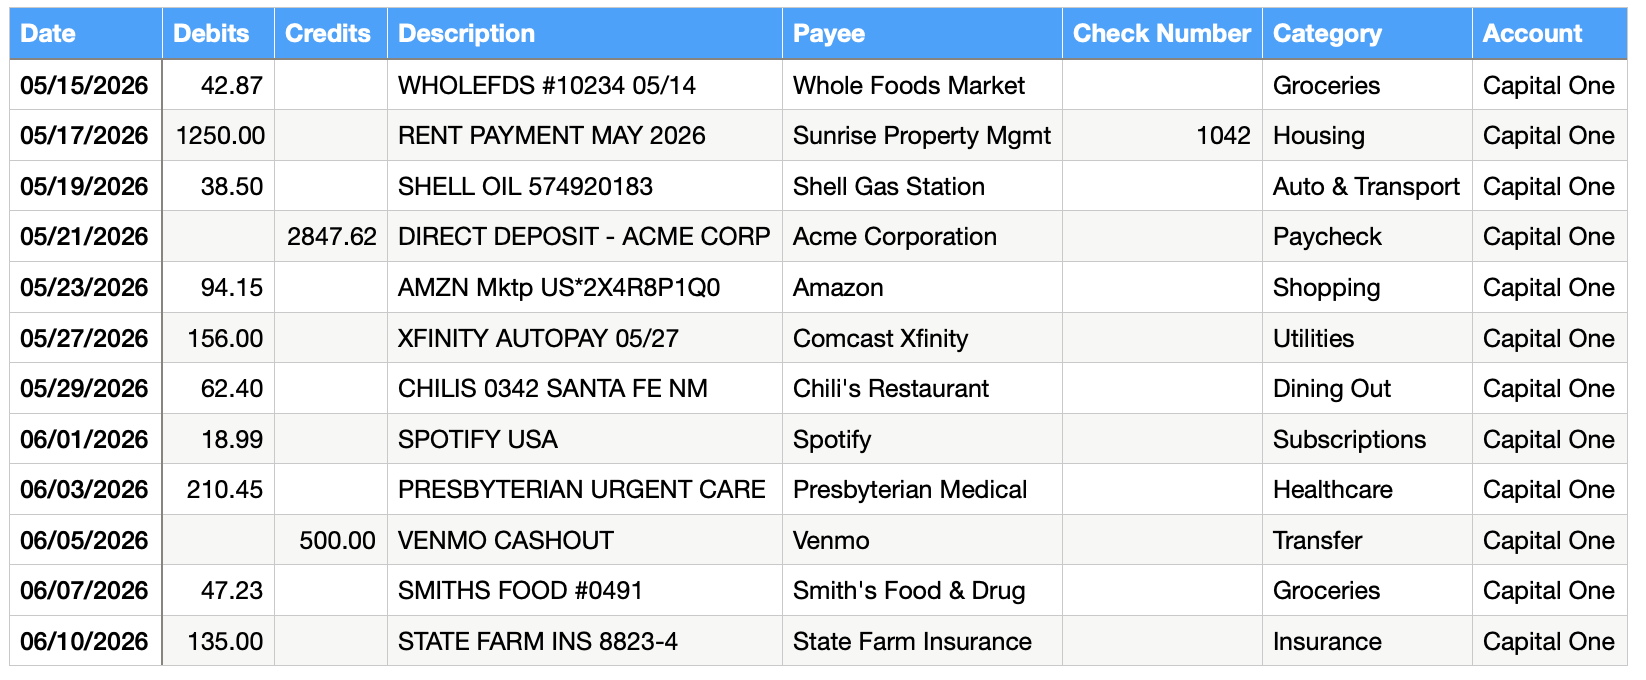
Load File button. After clicking that button you will be redirected to the Import Options page. Some examples of properly formatted CSV files are shown below. These CSV files contain the same transactions but show the difference between having a single Amount column and two dedicated Credit and Debit columns.
Before your transactions are fully imported you'll be presented with some options to make sure the transactions are imported properly. We call this the Import Options page and each section of this page will be broken down below.
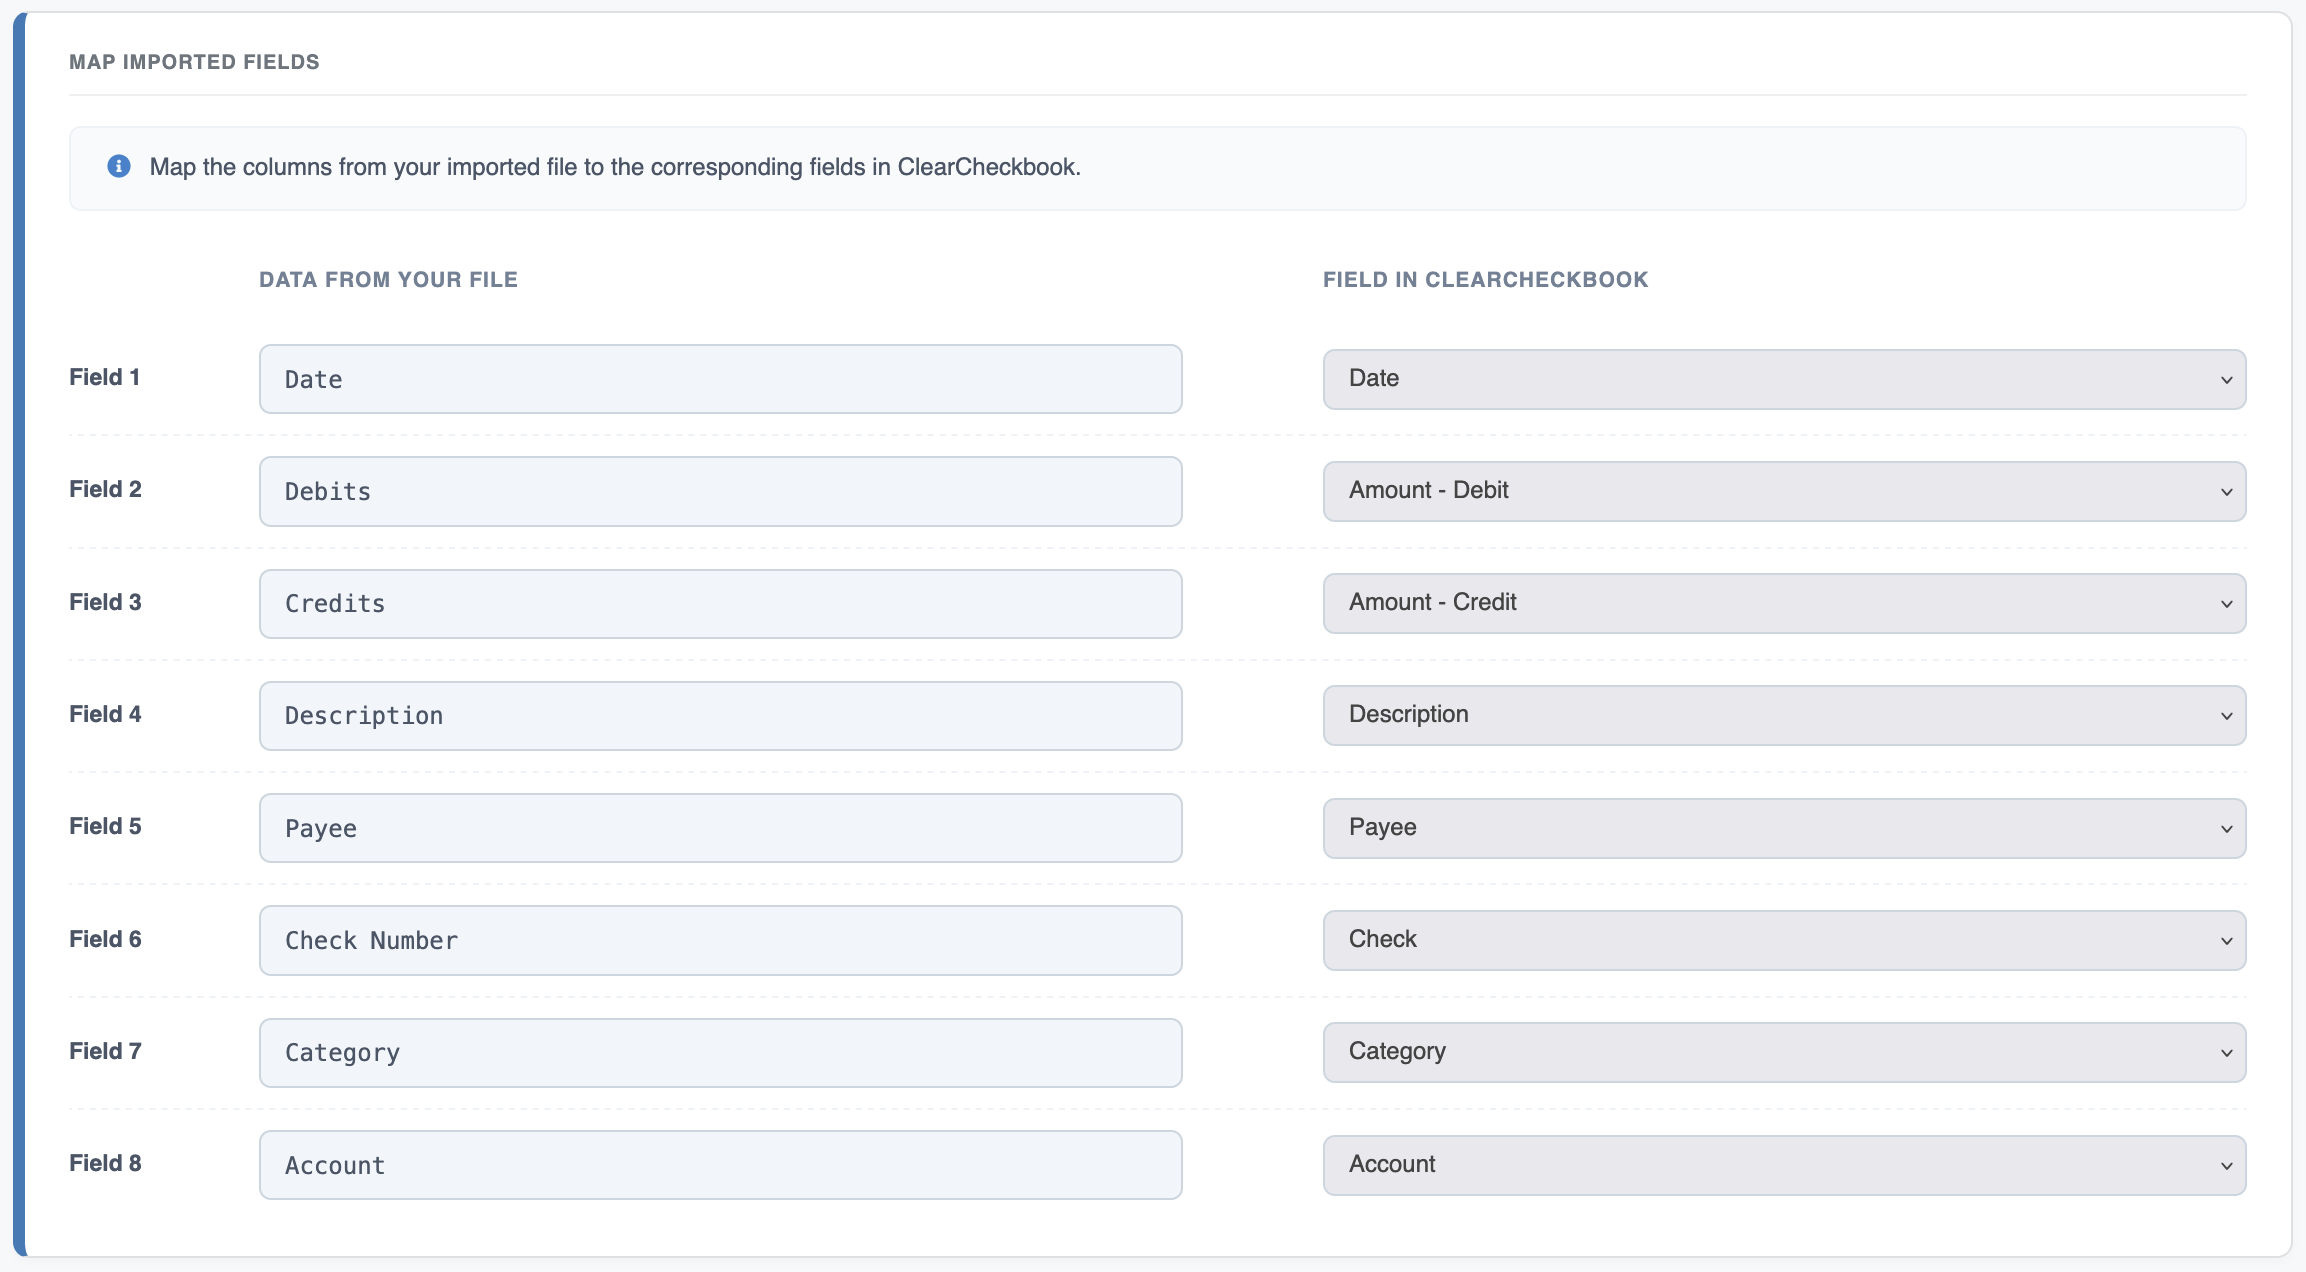
Imported FieldsWhen you import a file we do our best to match the fields in the file with those in ClearCheckbook. This gives you the option to double check that the fields are set correctly. If your transactions don't look correct on the Import Verification page, these field matching options are usually to fault.
Import OptionsThere are several options available to help make sure the data is red correctly and only the transactions you want are imported.

Default Account
Change this to one of your accounts if you would like to force all the imported transactions into that account. If the file you're importing has data for multiple accounts or already has account data you can leave this blank.
Date Format
Be sure to change this option to match the format of the date field in your imported file. If the date shows up with today's date or January 1, 1969 then this field probably wasn't set correctly.
Skip Header Row?
If you import a CSV file, check this option if there is a header row with column titles such as Date, Amount, Account, etc. This will tell the system not to try and turn that row into a transaction.
Date Range
Change these options if you only want to import a subset of the transactions included in the file. By default the date range includes all transactions for the imported file.
Automatic Categories
This will use any automatic categorizations you have set up to categorize transactions based on their descriptions.
You can learn more about managing your auto-categorized settings by visiting the Settings Premium Membership Auto-Categorized Import Settings Knowledge Base section.
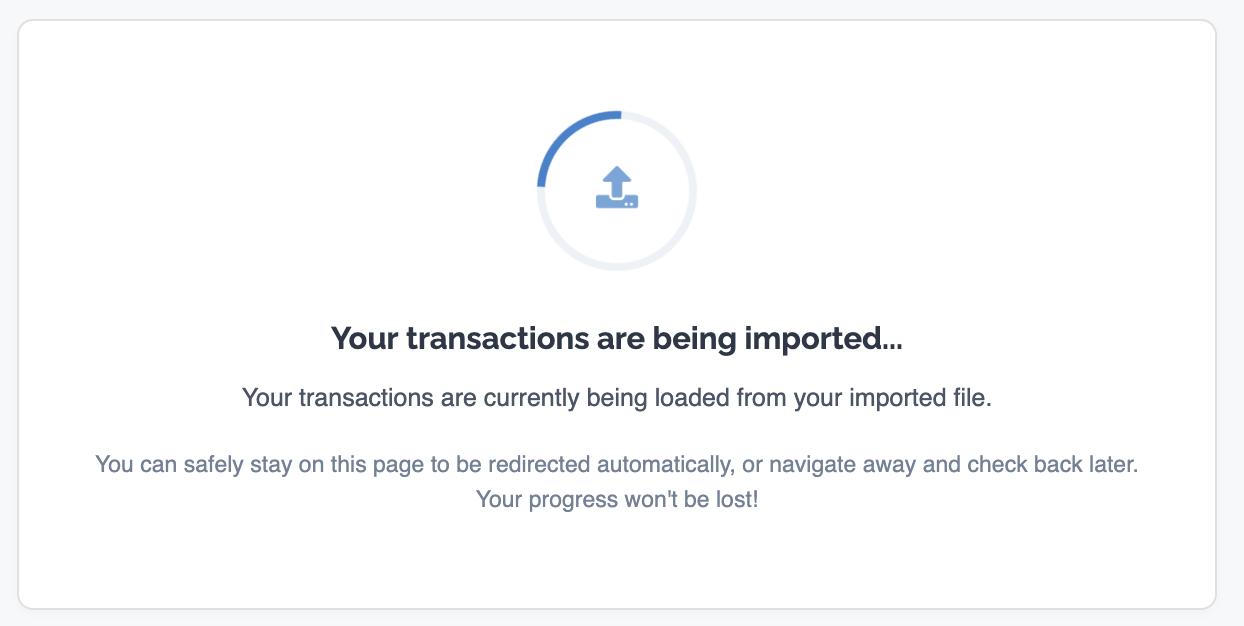
After you set all of your options you'll be redirected to a loading screen. This page will automatically redirect you to the Import Verification page once your transactions have been imported.
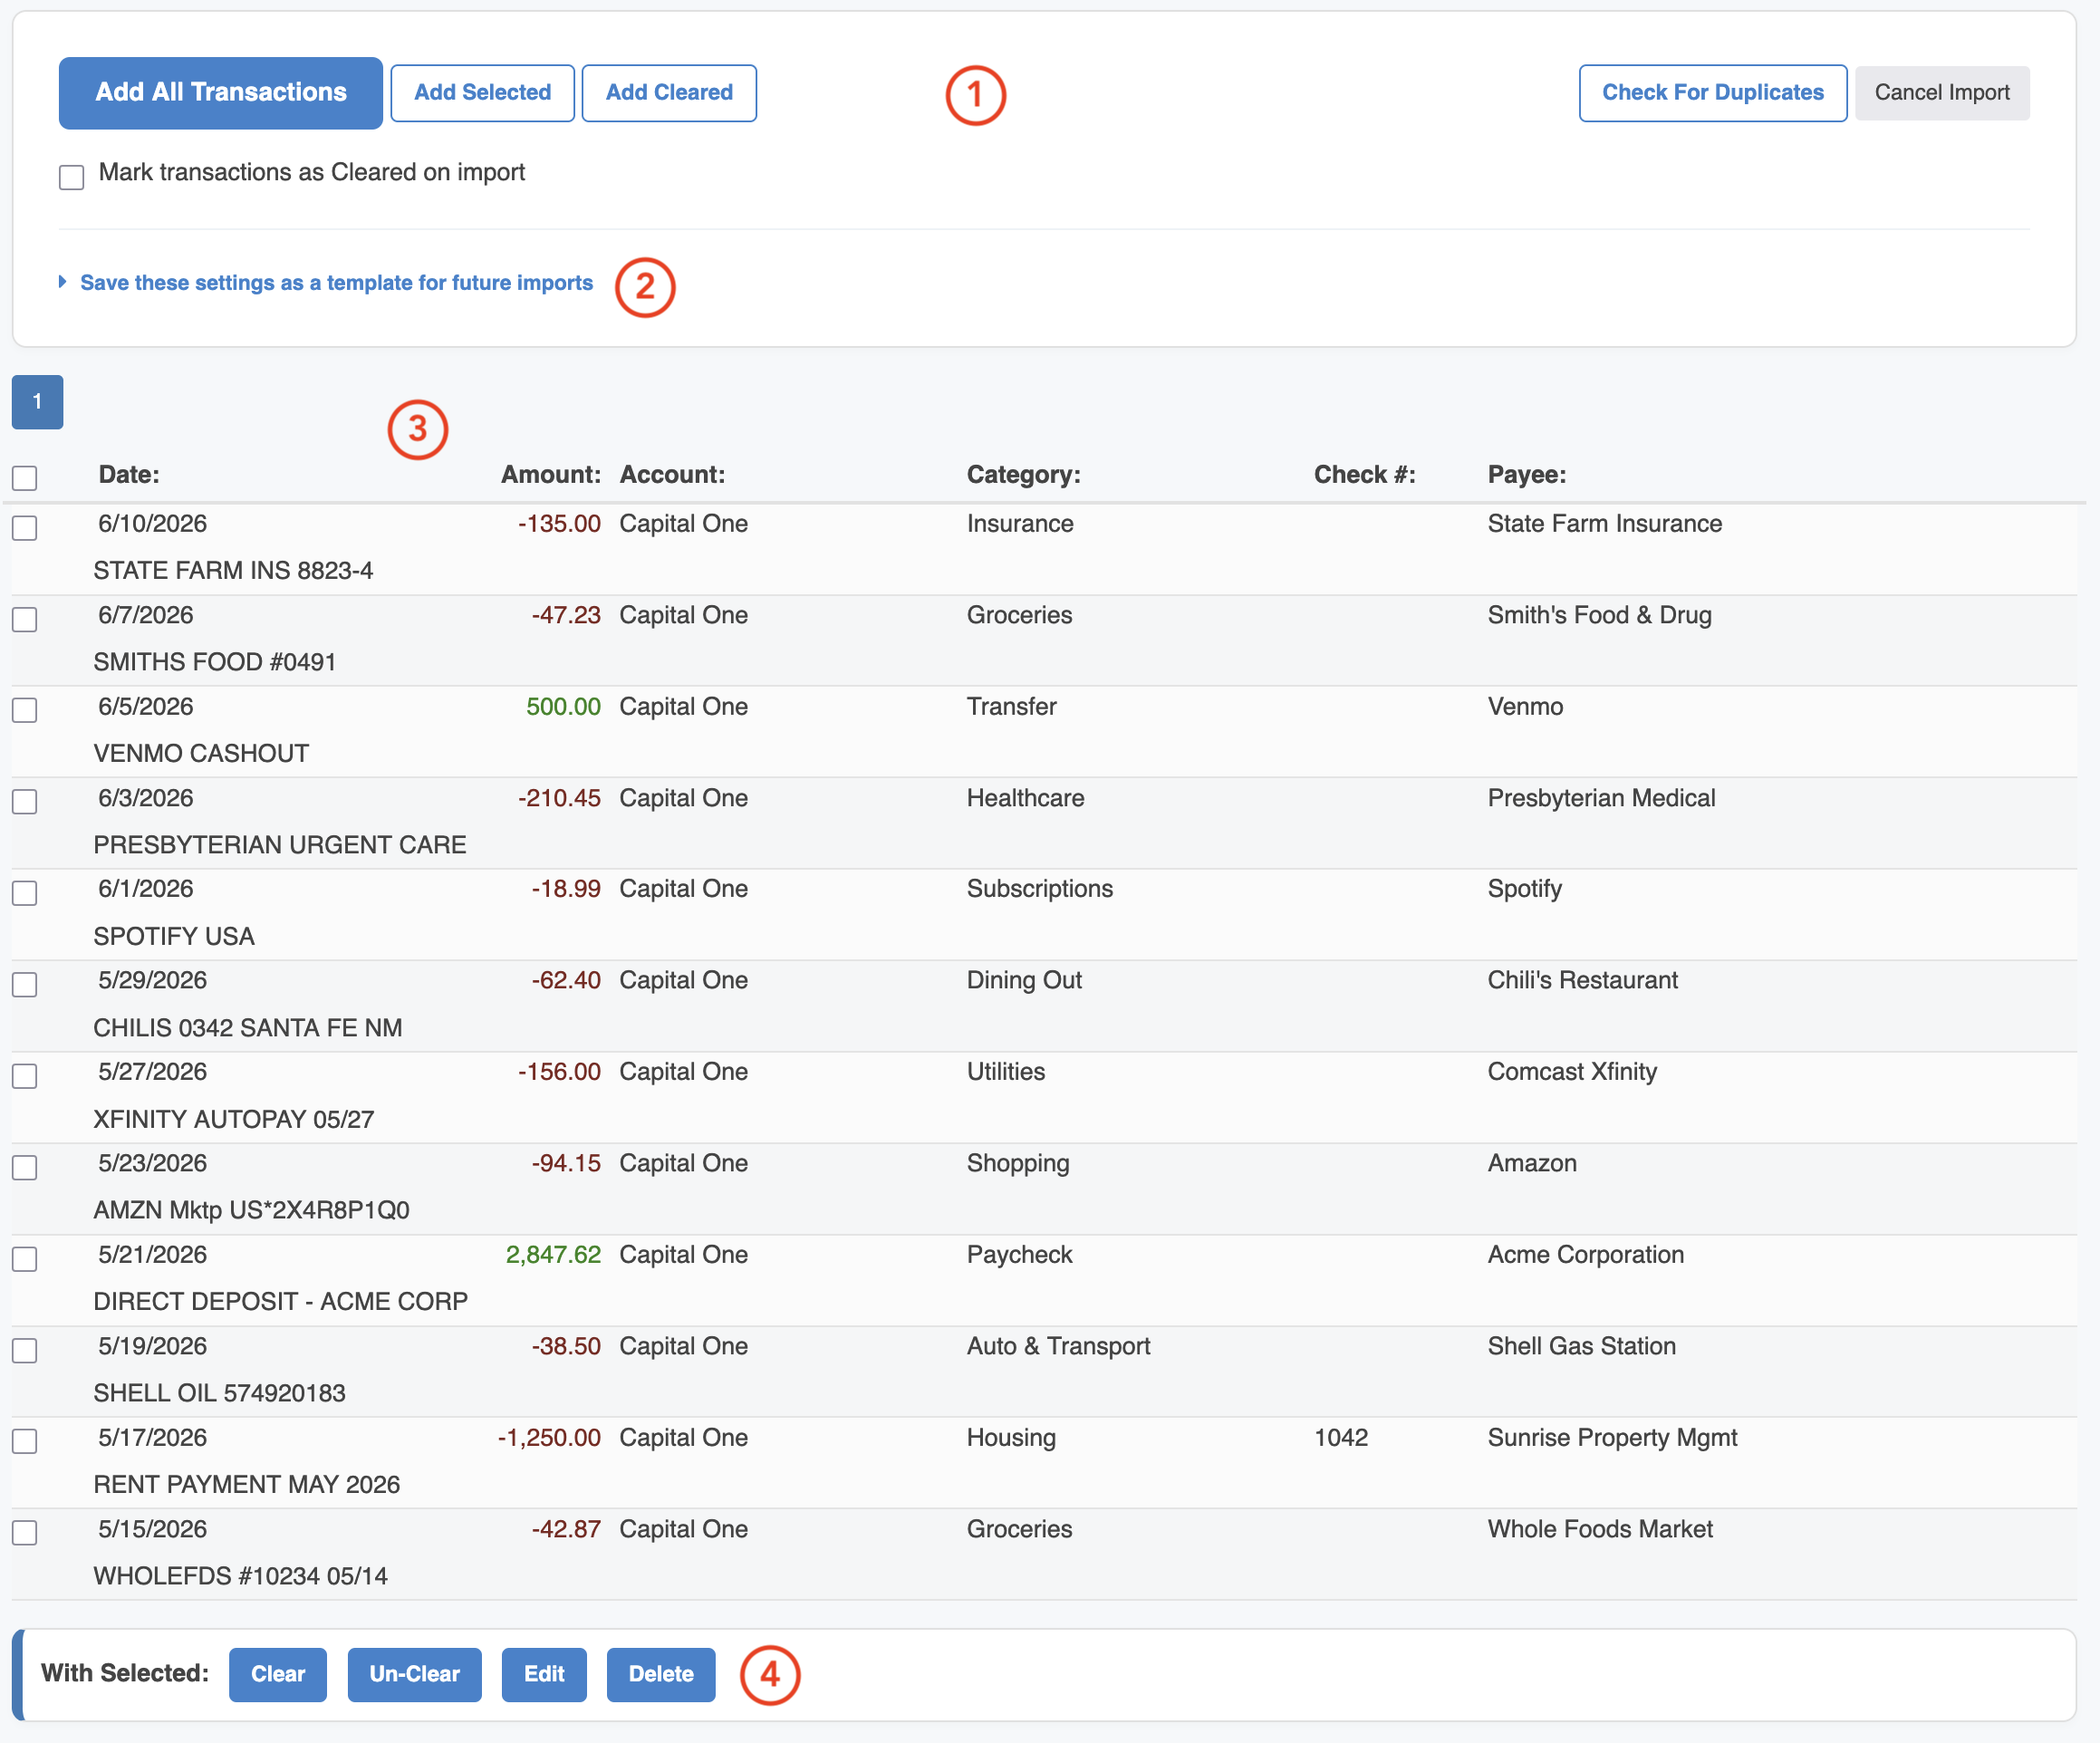
The Verify Imported Transactions page does just that - it lets you verify that the transactions loaded from the file look correct before fully adding them to your transaction register. The transactions will sit in this pending queue until you approve or delete them.
If there was a field mis-match or the dates weren't set properly, this is your chance to delete the transactions and try again.
This page has a few different sections which are shown in the screenshot and explained in the table below.
| Number | Description |
|---|---|
1 |
This is the action bar that lets you add or delete the imported transactions as well as check the imported transactions against your existing register to check for duplicates. These options are explained in more detail farther down this page. |
2 |
If you constantly import files from the same source over and over again and don't want to change the Import Options page each time, you can save the import settings and easily recall them in the future. |
3 |
The list of imported transactions. |
4 |
Perform certain actions on the selected transactions in the list. |
The action bar at the top of the Verify Imported Transactions page lets you perform several different actions which are explained in the table below.

| Action | Description |
|---|---|
Add All Transactions |
All transactions from the imported file will be added to your transaction register. Any accounts or categories that exist in the imported transactions but not in ClearCheckbook will also be added. |
Add Selected Transactions |
Only the selected transactions will be added to your transaction register. The rest will remain in the verification queue. Any accounts or categories that exist in the selected transactions but not in ClearCheckbook will also be added. |
Delete All Imports |
This will delete all the transactions that are currently in the verification queue. This does not affect any transactions that have previously been imported and added to your transaction register. |
Check For Duplicates |
This will open a new page where you can compare the imported transactions with those in your transaction register to see if any already exist. You can learn more about this tool below in the Check for Duplicates section. |
Clear transactions on import |
Check this option if you want all of the transactions you're importing to be marked as cleared. |
The Check for Duplicates function is available to ClearCheckbook Premium members and allows you to check if any of the transactions from the imported file already exist in your transaction register. To access the duplicate checking tool, click on the Check For Duplicates button in the action bar at the top of the Verify Imported Transactions page.
The form at the top of the page lets you set some variables that determine whether or not transactions are a match. You can change the allowed difference in amount and difference in days. By default, the form will look for exact amount matches with a maximum difference of 3 days allowed.

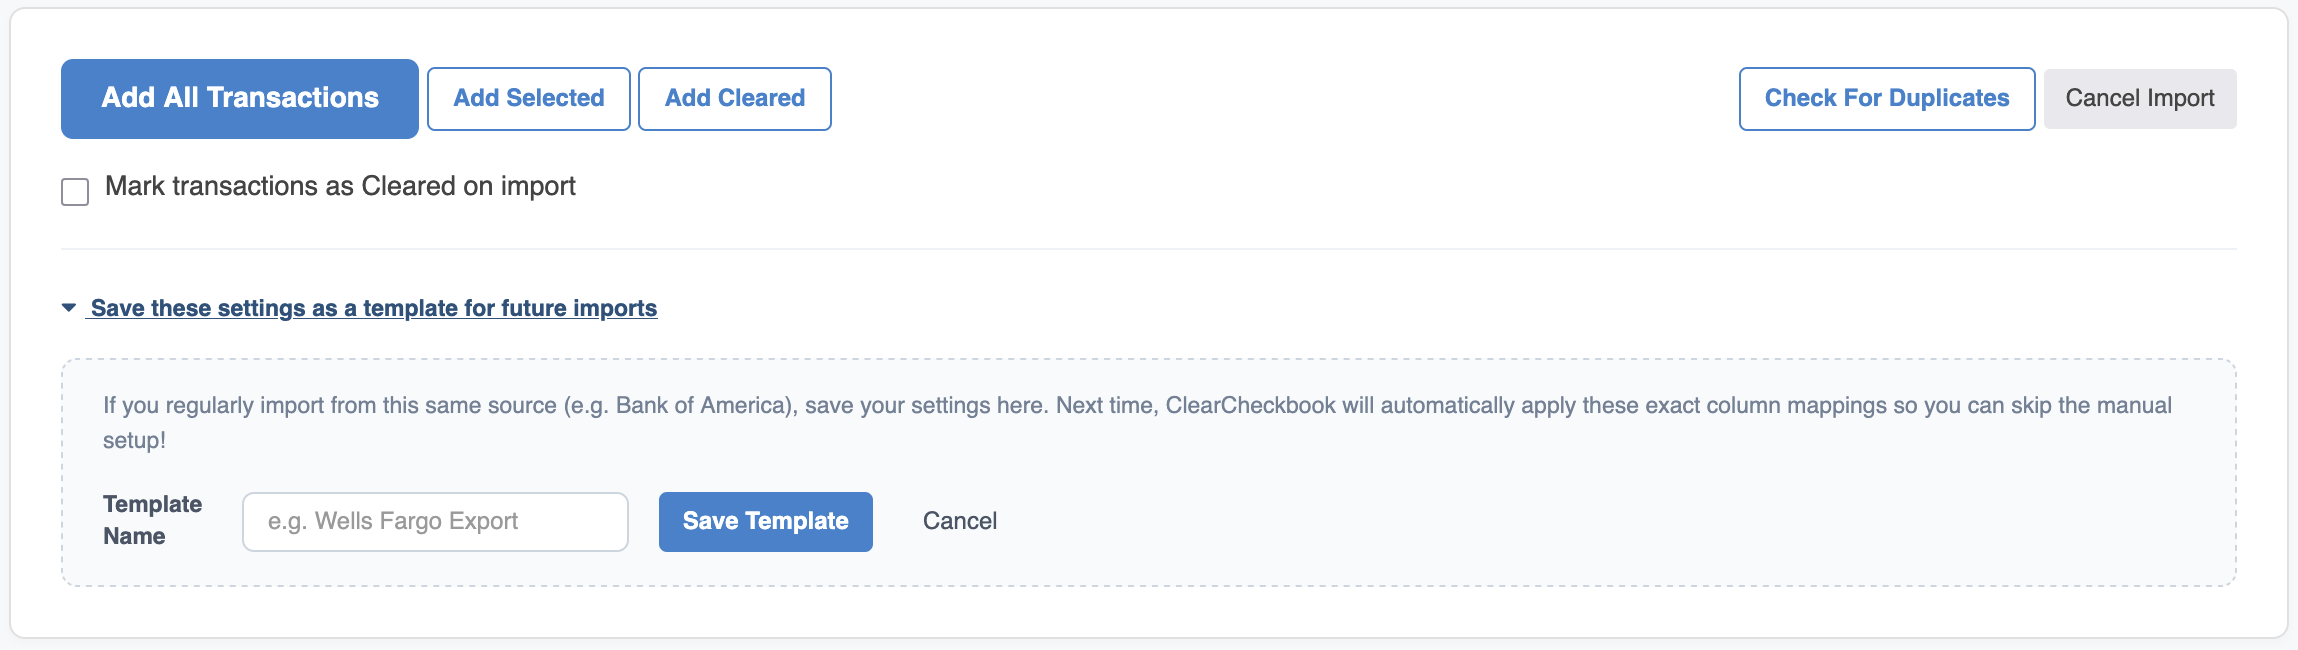
If you regularly import files from a source that requires you to change settings in the Import Options page, you can save those settings here so you can quickly load those settings next time you import a file from that source.
To save the import options settings, click the Expand Save Import Settings Form link.

You can then give the saved setting options a name. We'll call this one CCB Import.
The next time you import a file you will see a new form at the top of the Import Options page. This new form lets you select a saved setting option and when selected will load all the previously used settings.

The transaction list on the Verify Imported Transactions page behaves almost exactly like your normal transaction register. There are a few differences though which include sub categories showing up with the parent prepended to the category name. Sorting the transaction list is also not available on the imported transaction list.
You can click on a transaction to bring up an edit form which has all of the same options as the standard Edit Transaction form. If you select transactions you can also mass Clear, Un-Clear, Edit and Delete them. If you select two transactions you can also make them into a transfer (as a premium member).
If you need to leave the import verification process, you can come back later and pick up where you left off.
When you visit the Import Transactions tool and you have transactions that are still awaiting verification, a new alert will appear at the top of the page. Click on the View your Imported transactions link to view your unverified transactions.

There was an error importing your file.
The file was not imported properly. Try again and if it still fails, please contact us.
You're attempting to import a QDF file. This is an encrypted file can only be read by Quicken. Please export to a QIF, OFX, QFX or CSV file to continue.
As the message says, you mistakenly imported a QDF file which is a file we cannot read due to it being encrypted by Quicken.
You're attempting to import an unsupported file type (XXX). We only allow QIF, OFX, QFX and CSV files.
This message appears if you try importing an unsupported file type.
No Transactions Found...
This usually happens if there is a field mismatch from the Import Options section. Double check that the fields are matched properly and try again. If you continue to see this error, please contact us and we can investigate further.
You must select at least one transaction to import.
You will see this message if you click the Add Selected Transactions button from the Verify Imported Transactions page but don't actually select a transaction.
The file ID is not valid. Please try again. If you continue to receive this error please contact us.
This error is very rare and will only appear if the URL has been manipulated when accessing the Import Options page.
Watch this video tutorial to learn how to import transactions from your financial institution into ClearCheckbook.
Direct link to YouTube